

A UV/IR Bench Guide to Fitting Out Hardware and Software
2015-2021, retired the X100T after six years only for it to phoenix itself into a lovely UV/IR full spectrum converted image creation machine. Maybe that’s a bit much, but certainly better than sitting on the less used camera shelf with the Olympus OM-1 and Canon 1D X.
[ Download: Fuji_X100T_UV-IR_Full_Spectrum.pdf ]
The conversion was performed by LifePixel for a couple hundred bucks, the filters of interest were purchased through KolariVision. Both perform conversions and sell filters.
https://robertreiser.photography/infrared-camera-conversion-service
The UV/IR full spectrum conversion consists of removal & replace of the camera’s UV/IR blocking ‘hot mirror’ filter with an optically clear glass allowing the full spectrum of light energy to blast the imaging sensor. The camera is now capable of ‘seeing’ outside of human vision up into the UV spectrum and down into deep IR. The sensor itself is the limiting factor in its upper and lower bounds, but generally can see UV & IR light invisible to humans.
Next come the requisite UV/IR filters as I’ve begun to describe. KolariVision sells a UV band pass filter which enables some very interesting photographic perspectives. I don’t have KolariVision’s UV filter, but can comment on using their IR blocking hot mirror filter on top of their Blue IR / NDVI filter: This combination allows 375nm-435nm UV-A through Blue into the camera, effectively making this an extended UV filter. It’s a pretty cool (ha!) combination for UV B&W imagery. KolariVision’s take on UV photography specifically:
https://kolarivision.com/category/uv-photography
Now the choice of IR filter. The basics are the deep IR 850nm filter, blocking all human visible light, allowing for typical B&W IR images. The other basic is the 720nm filter, good for both B&W and false color IR imaging. Beyond these, filters allowing more of the visible spectrum can be used as explained by both KolariVision and LifePixel:
https://kolarivision.com/articles/choosing-a-filter
https://www.lifepixel.com/infrared-filters-choices
Nice. What now? Images SOOC, straight-out-of-camera as FujiXWeekly’s Ritchie Roesch would say, that’s what. After all, we are shooting a Fuji-X camera, built by FujiFilm engineers with a very long history of straight out of the camera photographic experience. What does SOOC _really_ mean? It means the camera produces pretty much a final image. IfNeeded™, slight addition of curves, contrast, cropping, normal post-shutter image development, is what SOOC means. With digital, it means using as lightweight a SW system as possible to get in and out quickly. Does this mean firing up the heavyweight champ Photoshop on my bigperson's desktop computering system? No, not really. How about Snapseed or RAW Power on my phone? Yes, much more lightweight.
https://fujixweekly.com
https://fujixweekly.com/2018/09/22/my-fujifilm-post-processing-workflow
Can my Fuji-X camera produce SOOC those ever-so-fancy false color IR images I’ve seen all over the interwebs? No. Well, sort of, maybe, yes, but no, not really, no.
Filters:
850nm Deep IR filter: This filter is so far away from visible light that it is really only best at producing classic B&W IR photographs. False color? No, not really. SOOC? You bet!
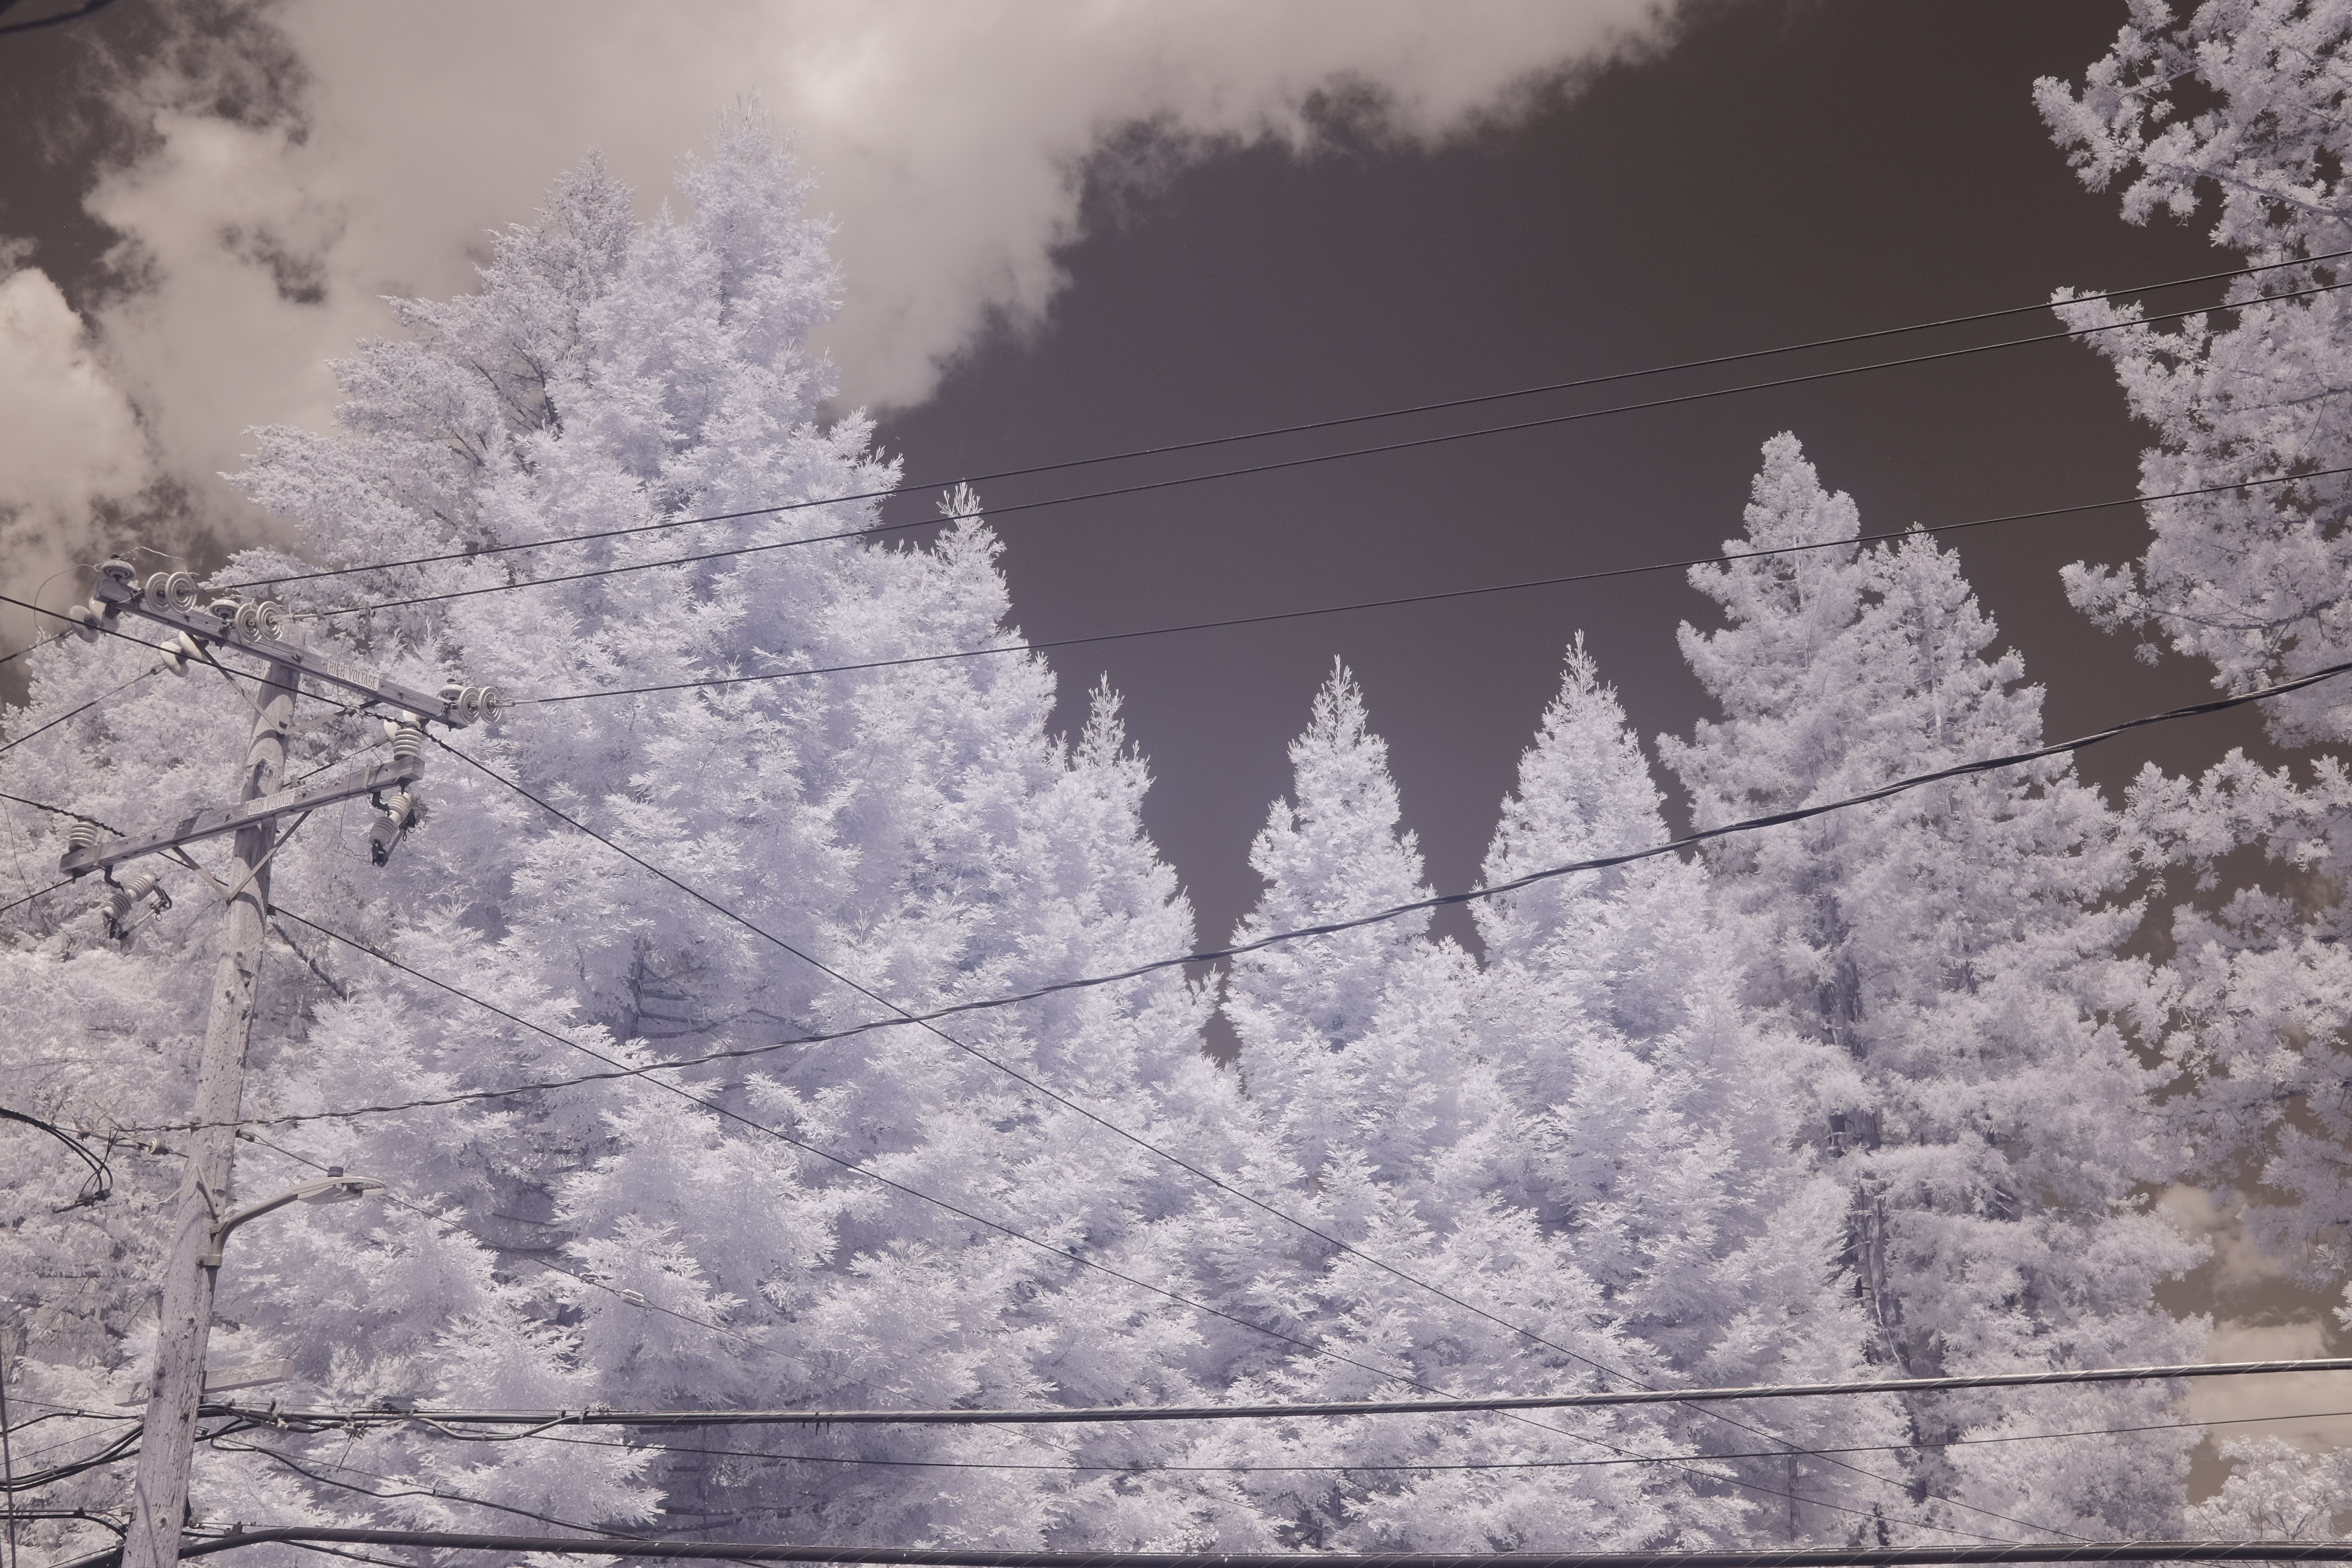
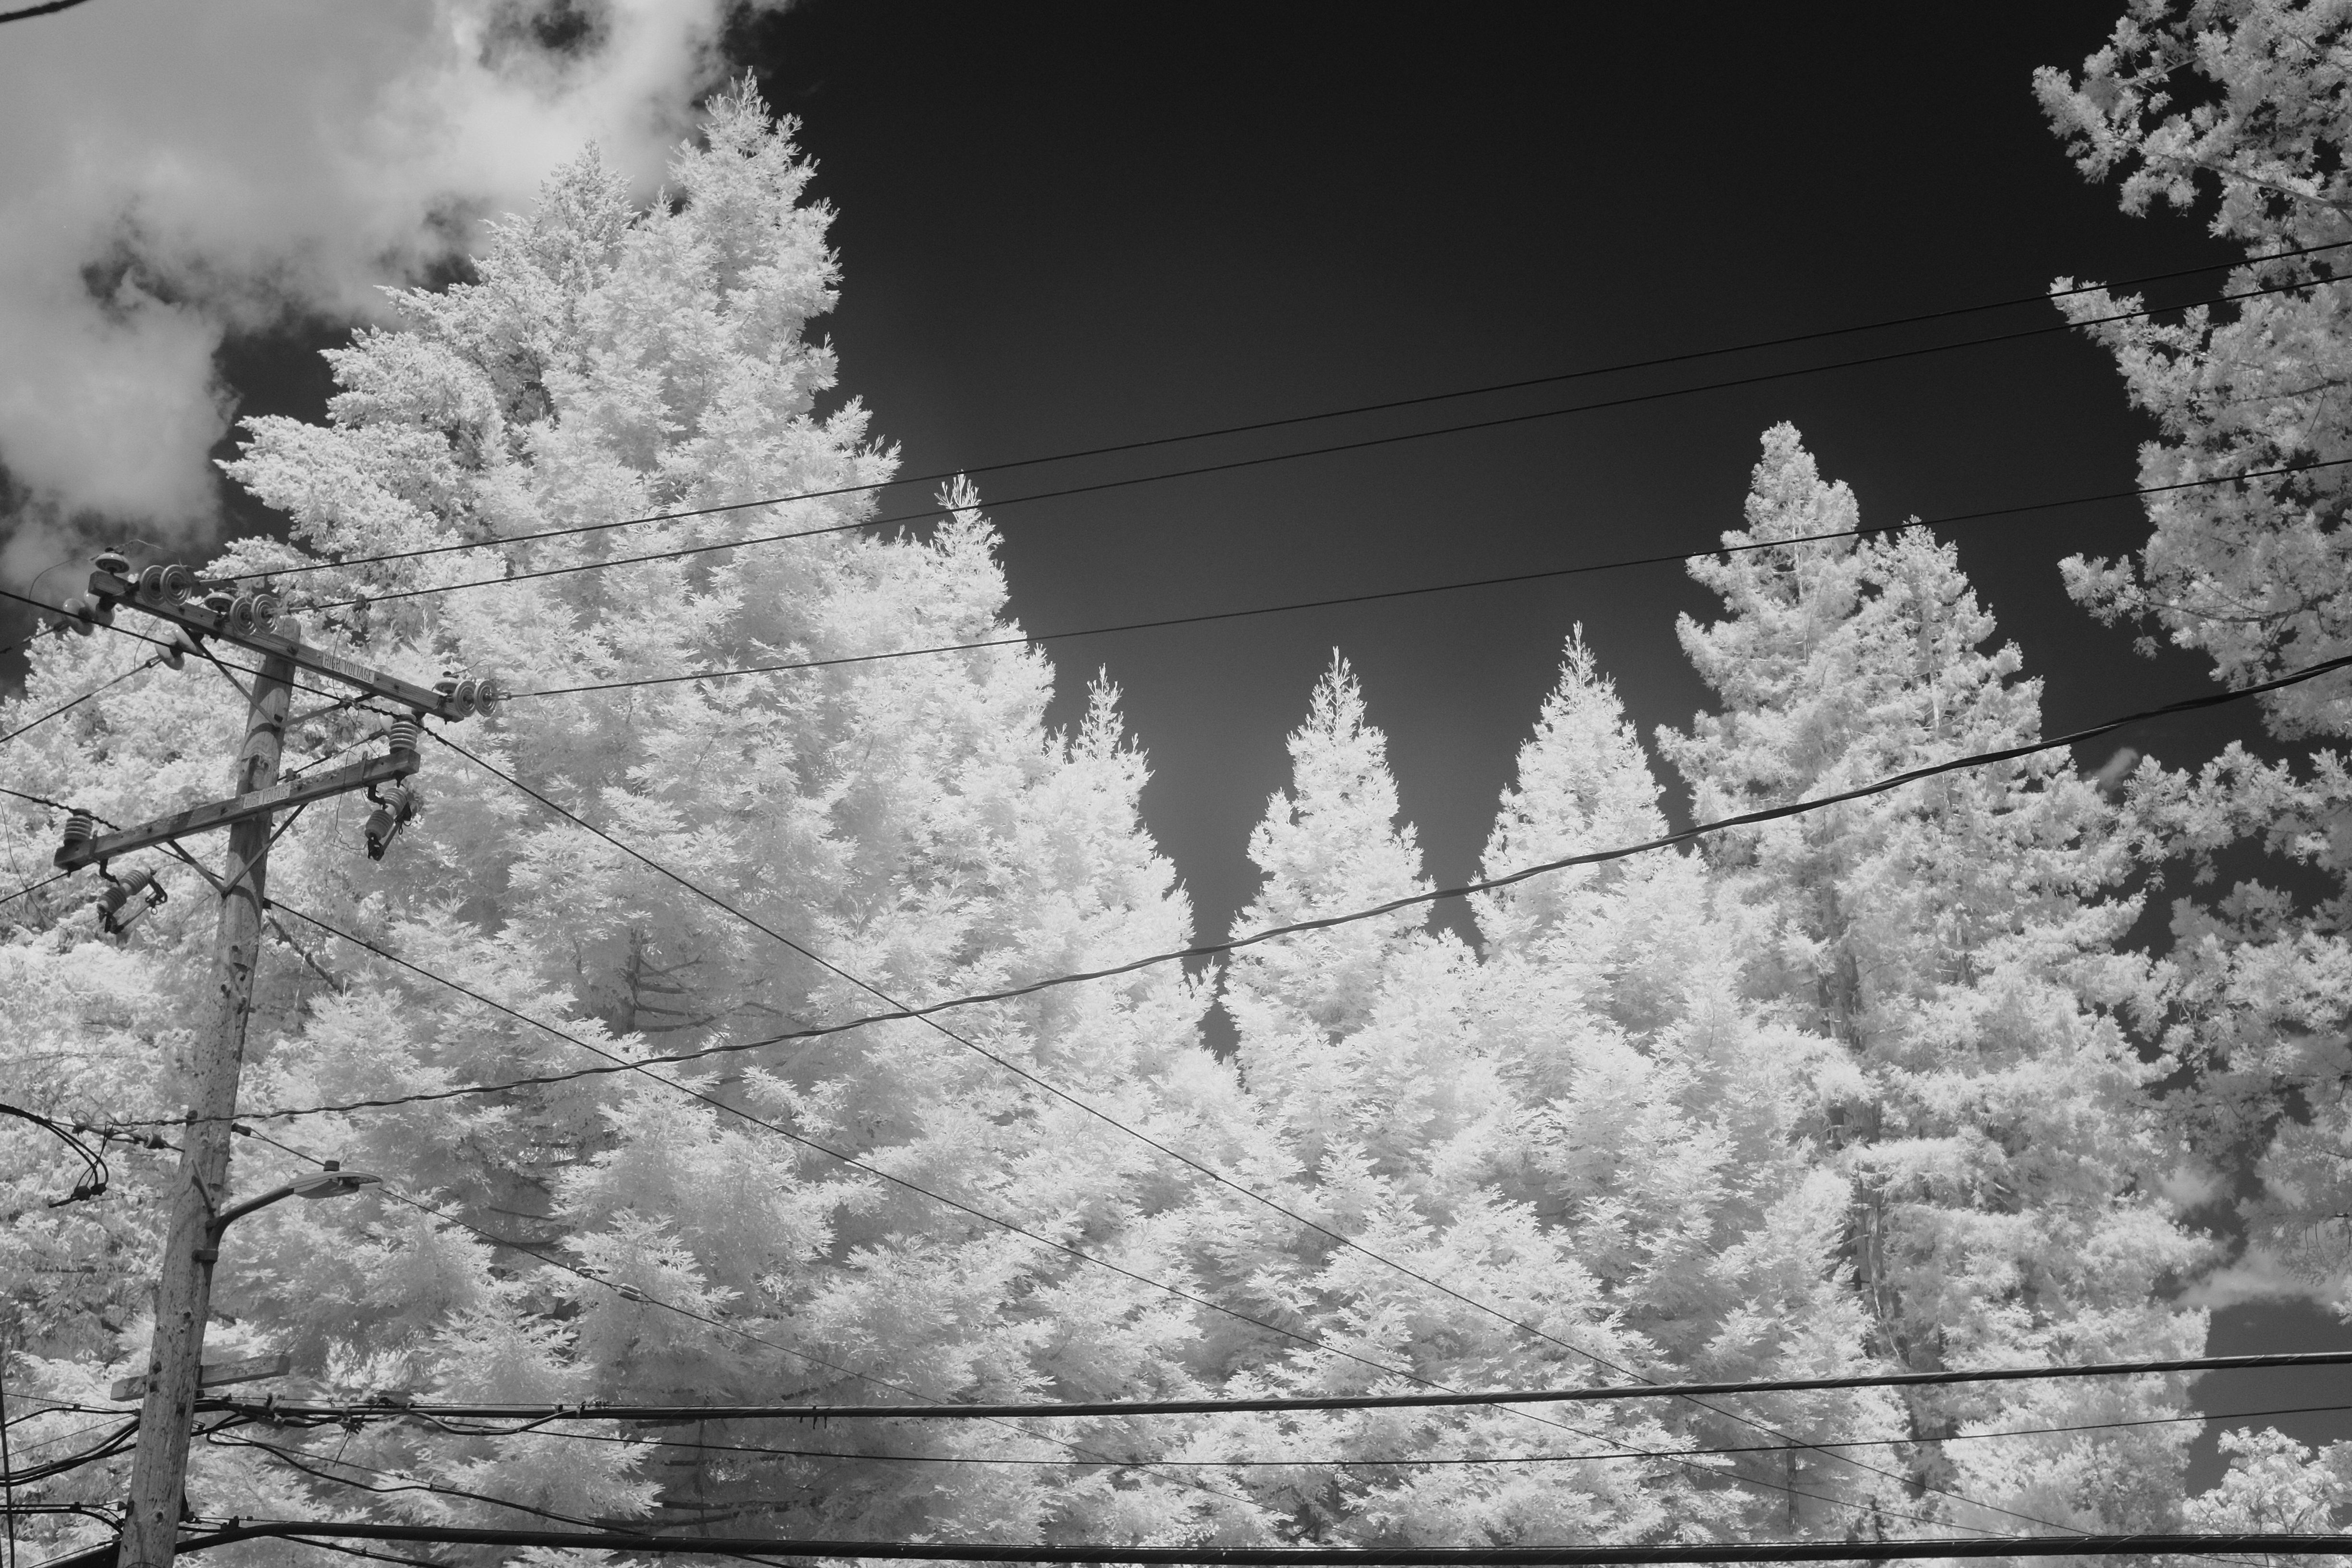
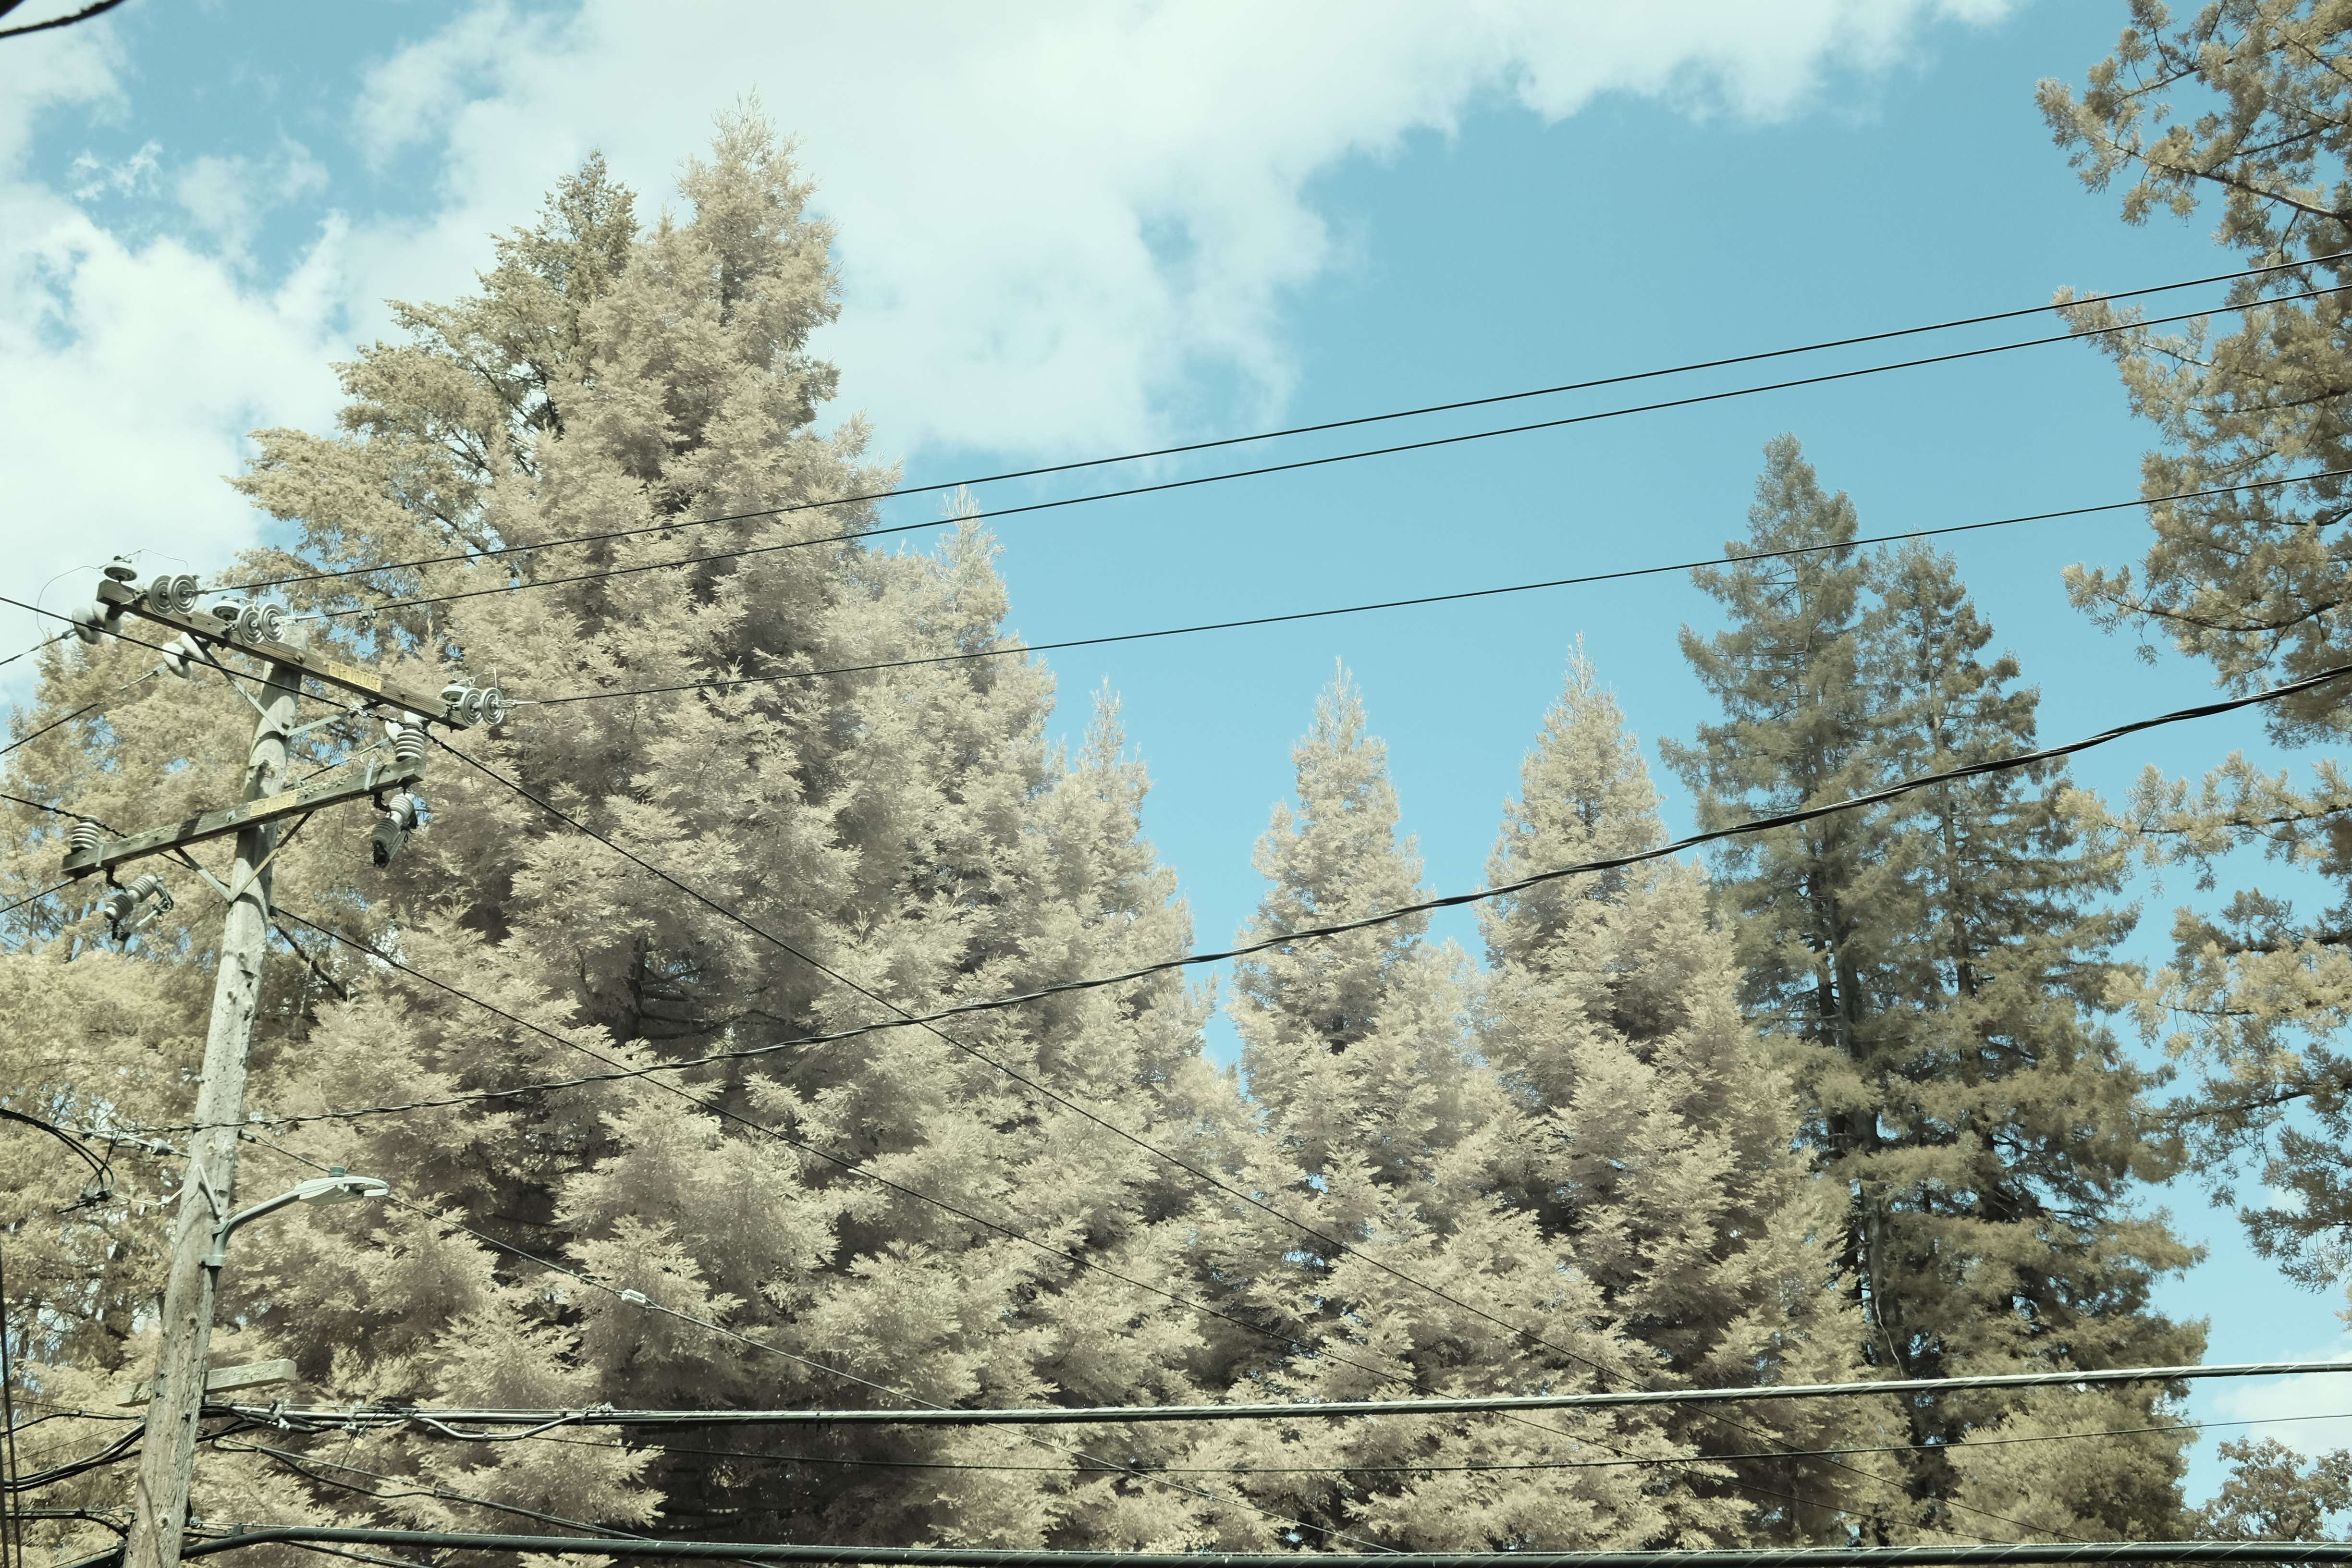
720nm Standard IR filter: This classic IR filter allows for good IR capture as well as a teeny bit of visible light. This teeny bit of visible light is what makes this filter capable of some amount of color SOOC, subdued though it is. It also allows images created with this filter to be manipulated in heavyweight SW systems to produce all kinds of false color goodness, including those crazy IR photography blue skies. SOOC? Yah, sort of. Yes.
665nm, 590nm, 550nm, 470nm ‘Enhanced Color’ Filters: These filters simply allow more and more visible light + IR into the camera. 470nm is up into the blue range so allows all of ROYGB (but not IV), 550nm ROYG, 590nm RO, and 665nm R. It’s all about creative choices. To each their own. SOOC? Sure, why not.
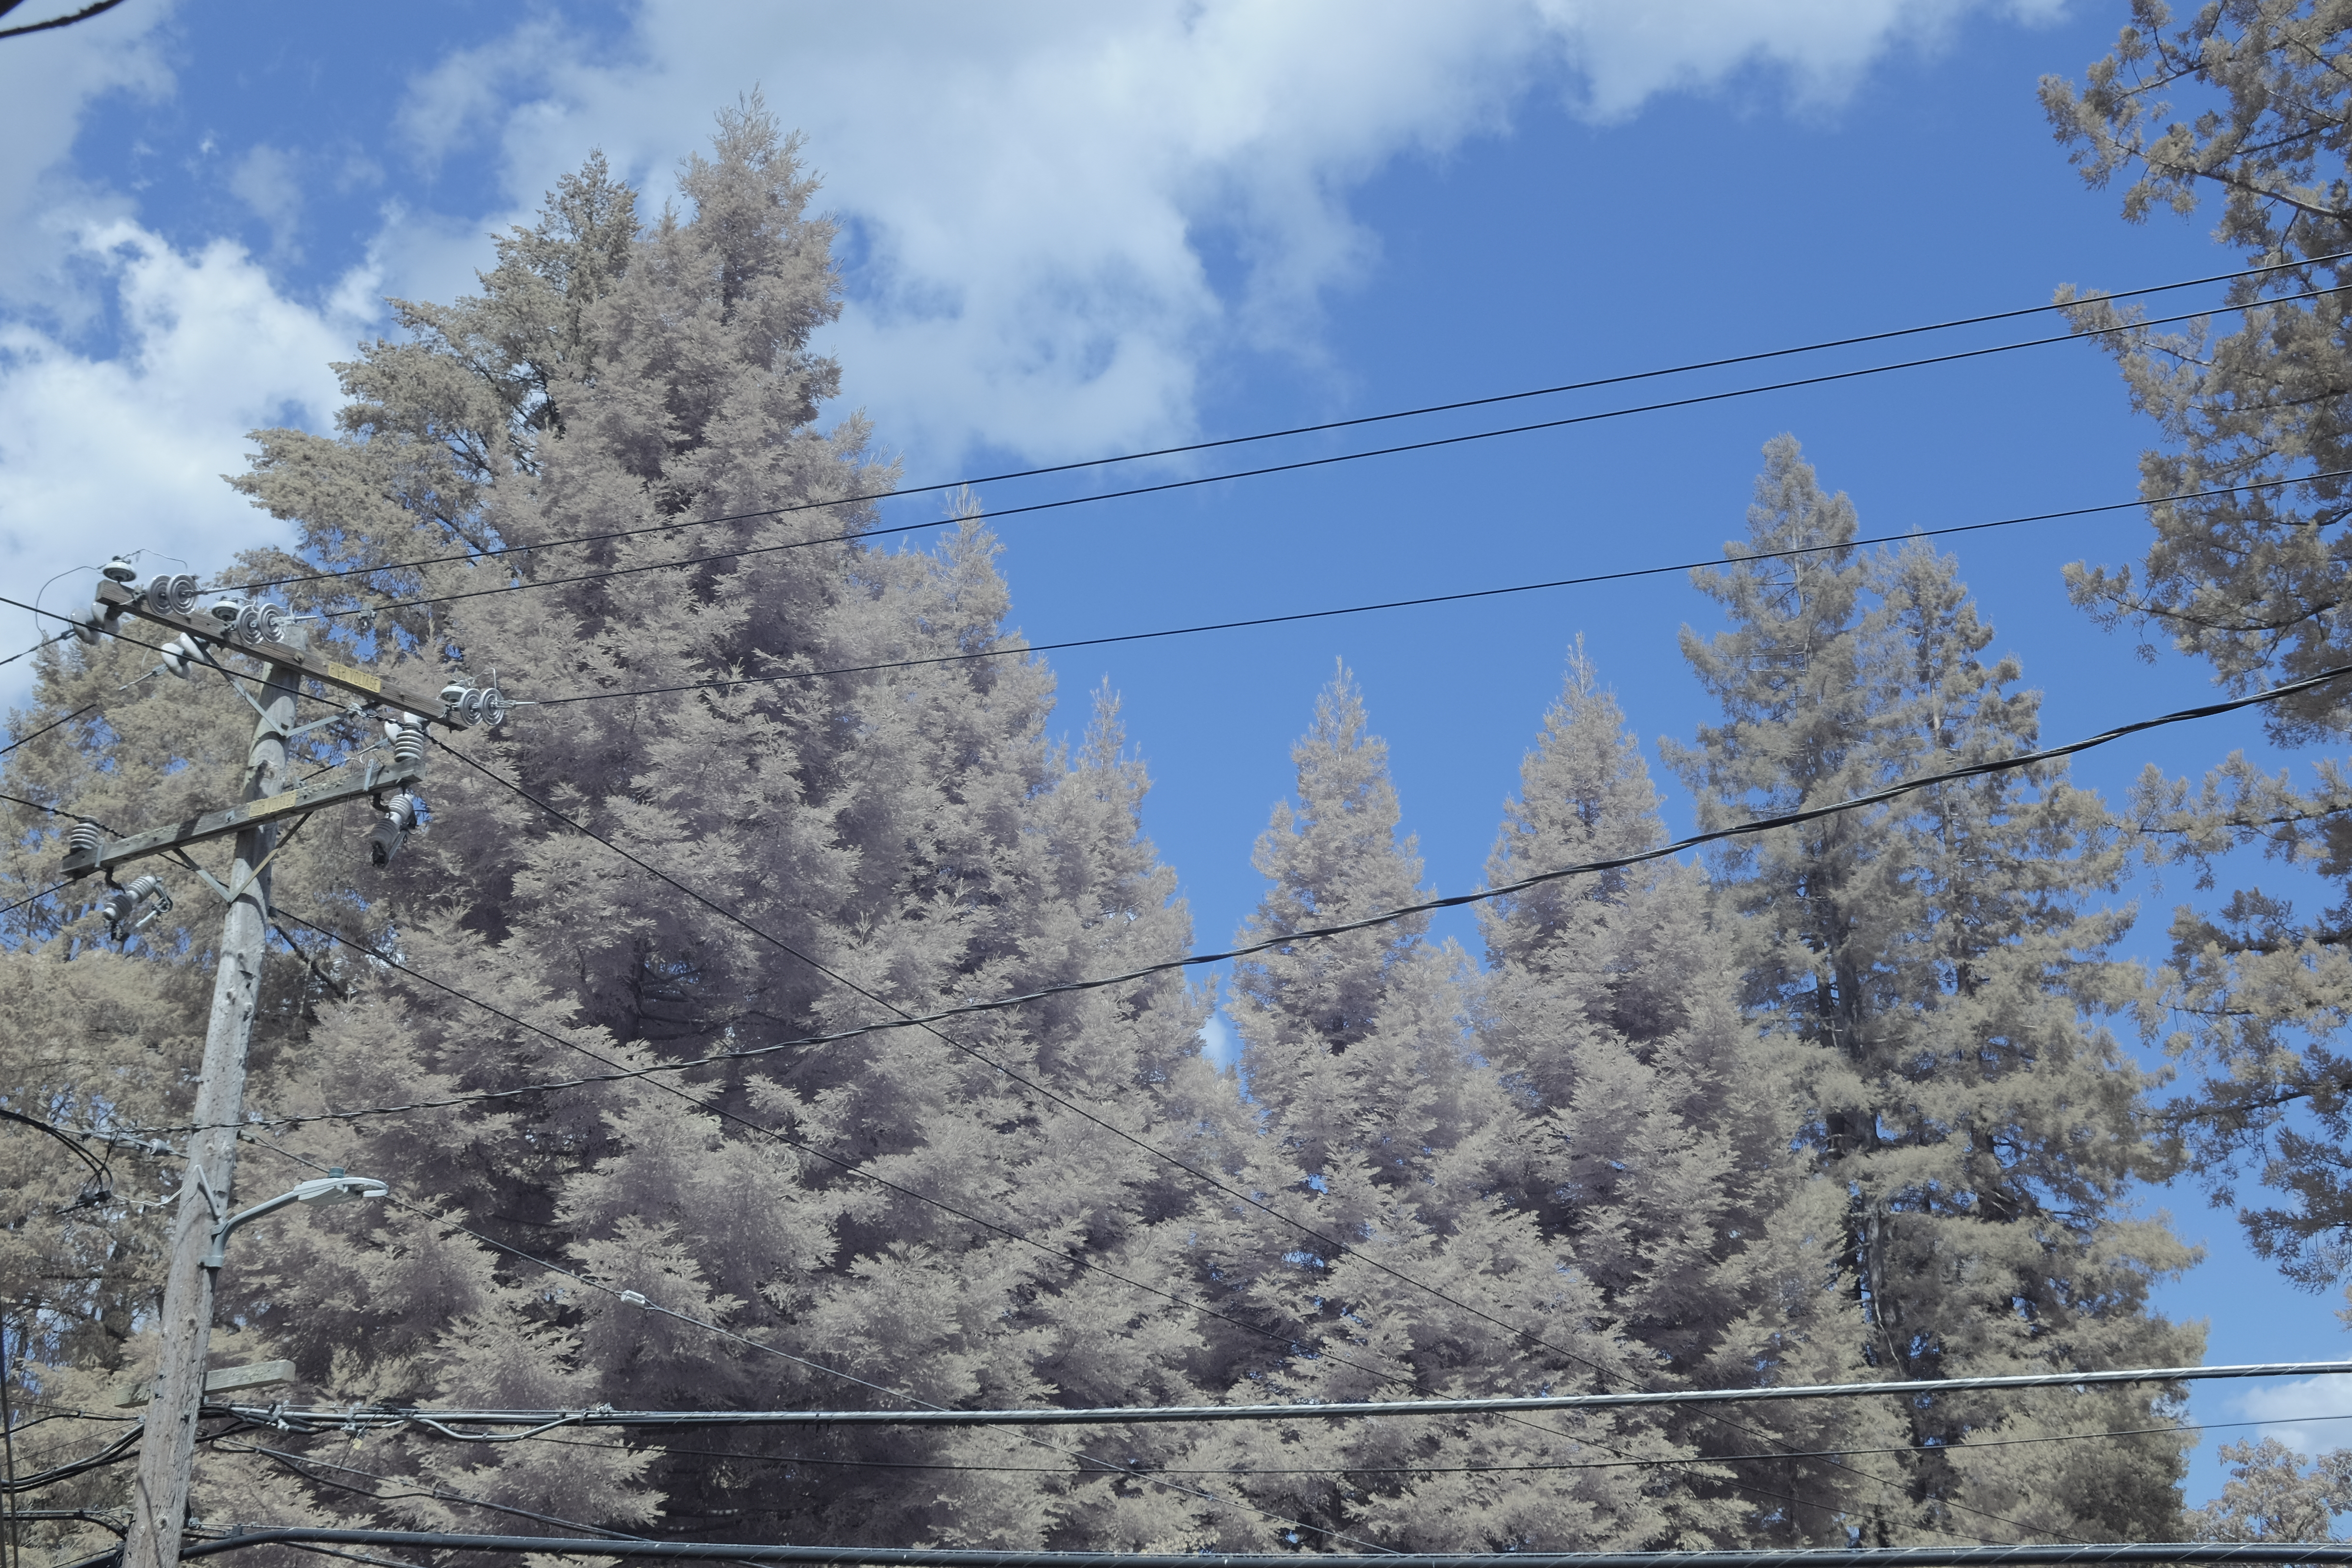
Back to that 720nm filter, right on the edge of human vision perception. SOOC, with a decent white balance, I’ve been able to create warm neutral images with hints of blue, colors all very subdued. Perhaps best described as a very nice day on Mars. That’s pretty much it, SOOC. Taking this image into Snapseed on a phone to make basic adjustments (curves, contrast, etc.) produces a pleasing completed image, but still a nice day on Mars. Taking this image into RAW Power on a phone, well, dang! RAW Power is like a darkroom equipped with not just a Beseler 23C and a sink, but a full color enlarger and temperature controlled processing chemistry, on your phone. False color IR here we come!
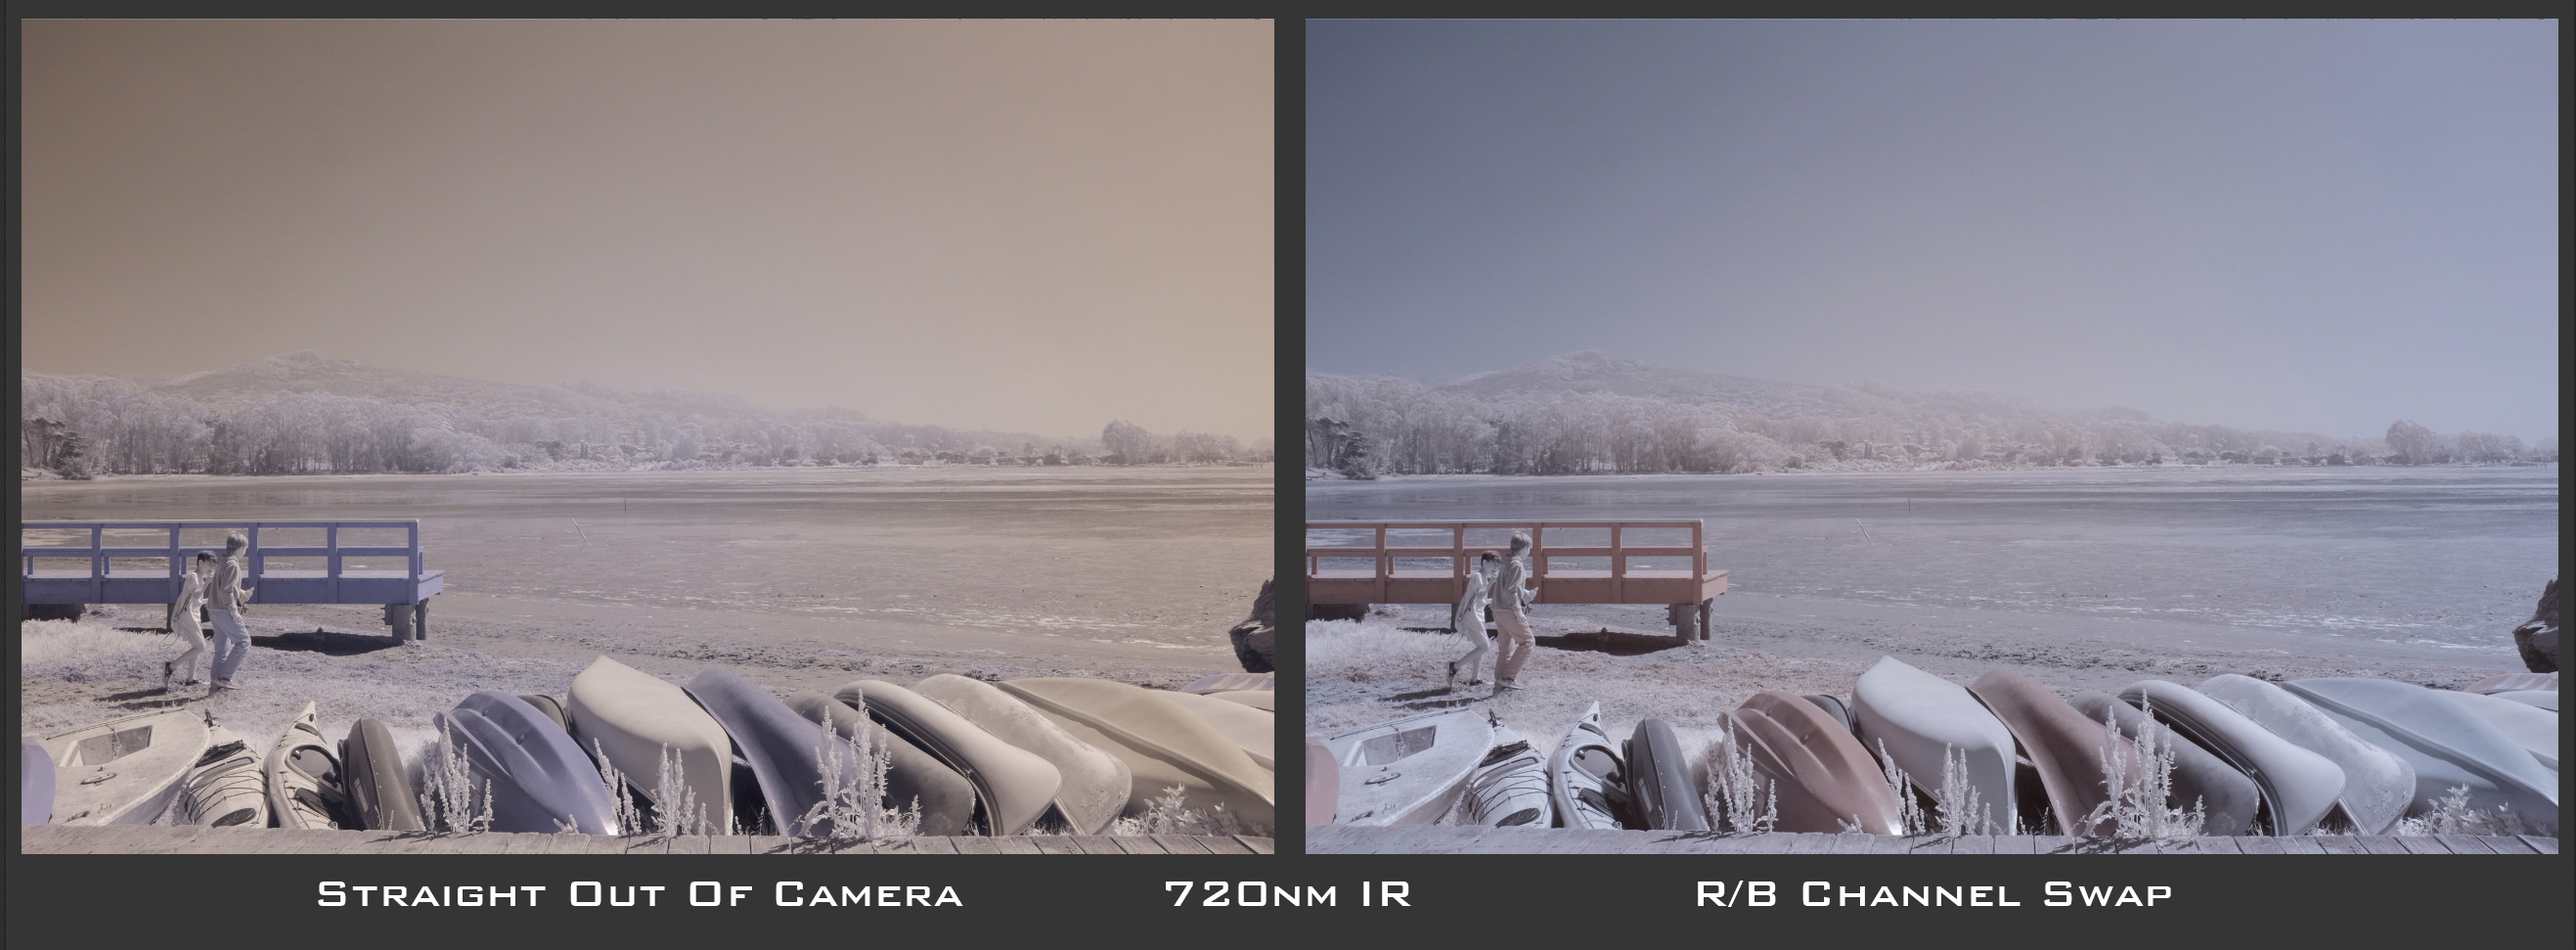
Images: Straight-out-of-camera and simple iPhone channel swap in RAW Power
R/B channel swap shows why the Blue Pier should remain Blue
A few notes on the software discussed here. Snapseed is the Google owned image editing app, created by the fine folks who also developed Nik Software for Photoshop. Google purchased the company, kept Snapseed, and sold off the desktop package to DxO. DxO now supports the Nik package and is well worth the price of admittance on your desktop system. Snapseed continues to be free, it is what it is, a pretty sweet image editing package. It’s novel UI, once quickly mastered, is a joy to use for super quick and efficient in-out image editing.
The on-the-go image editing powerhouse however is RAW Power. This package may look familiar to some oldtimers - it is basically Apple’s Aperture image editing program, clean room designed and built outside of Apple from the ground up for iPhone/iPad (and Mac desktop) by the super talented folks at Gentleman Coders. Oh, the head of this outfit played no small roll in Apple’s Photos Apps group during his eighteen year layover. Super smart, genuine, and all around good guy. The app costs $9.99 USD and runs on iPhone/iPad hardware. You get what you pay for, which is a lot.
Snapseed: Available on the Google Play and Apple App stores
RAW Power: https://www.gentlemencoders.com
What can RAW Power do with my 720nm nice day on Mars SOOC jpeg image? With its more exhaustive image editing controls, RAW Power provides control over color and luminance subtleties. It also offers LUT .cube file support as well as channel mixing. Channel mixing and LUT support are what make it possible to create those super crazy false color IR images seen all over the web. Take that SOOC image, or the nice finished image from Snapseed, and run it through RAW Power. Channel mix red and blue in the most standard way - 100% of red to blue and vis-à-vis. Boom. Blueish skies. Load these LUTs from Rob Shea Photography and, boom, similar blueish skies without the mixing. Powerhouse desktop capability on a phone:
https://blog.robsheaphotography.com/2020/06/29/lightroom-lut.html
https://groundcontrolcolor.com/pages/the-ultimate-lut-guide
Hint: A vibrant yellow/orange sky results in a vibrant false color blue sky.
RAW Power can develop RAW files. This means you can fine tune the camera’s white point of the RAW image for more subtle development. The following are a few IR processing links using Photoshop and/or Lightroom. Follow along with RAW Power on your phone just for fun:
- https://robertreiser.photography/infrared-photography-tutorial
- https://robertreiser.photography/proper-infrared-white-balance-in-lightroom
- https://robertreiser.photography/infrared-blue-sky-effect-lightroom
- https://photographylife.com/introduction-to-infrared-photography
- https://photographylife.com/how-to-process-infrared-photographs
- https://photographylife.com/infrared-photography-720nm-filter
- https://photographylife.com/reviews/kolari-vision-550nm-infrared-filter
- https://expertphotography.com/infrared-photography-basic-camera-gear
- https://www.canadiannaturephotographer.com/false_color.html
- https://kolarivision.com
- https://www.lifepixel.com
Other options: KolariVision Blue IR / NDVI and their custom IR Chrome filters. Both of these are dual band filters allowing blue and red onto the sensor, the amounts of visible spectrum depend on which of the two filters is used. The Blue IR / NDVI filter allows deep blue / UV as well as IR, pretty much both ends and outside of the edges of human vision. This filter has scientific duty in vegetation health analysis and is perfectly suited as a creative tool due to it ‘seeing’ outside of human ability. The IR Chrome filter on the other hand is purpose designed to mimic Kodak Aerochrome film SOOC. Given these two filters from KolariVision, the answer is a definitive yes, you can create those wonderfully colorful IR images SOOC.
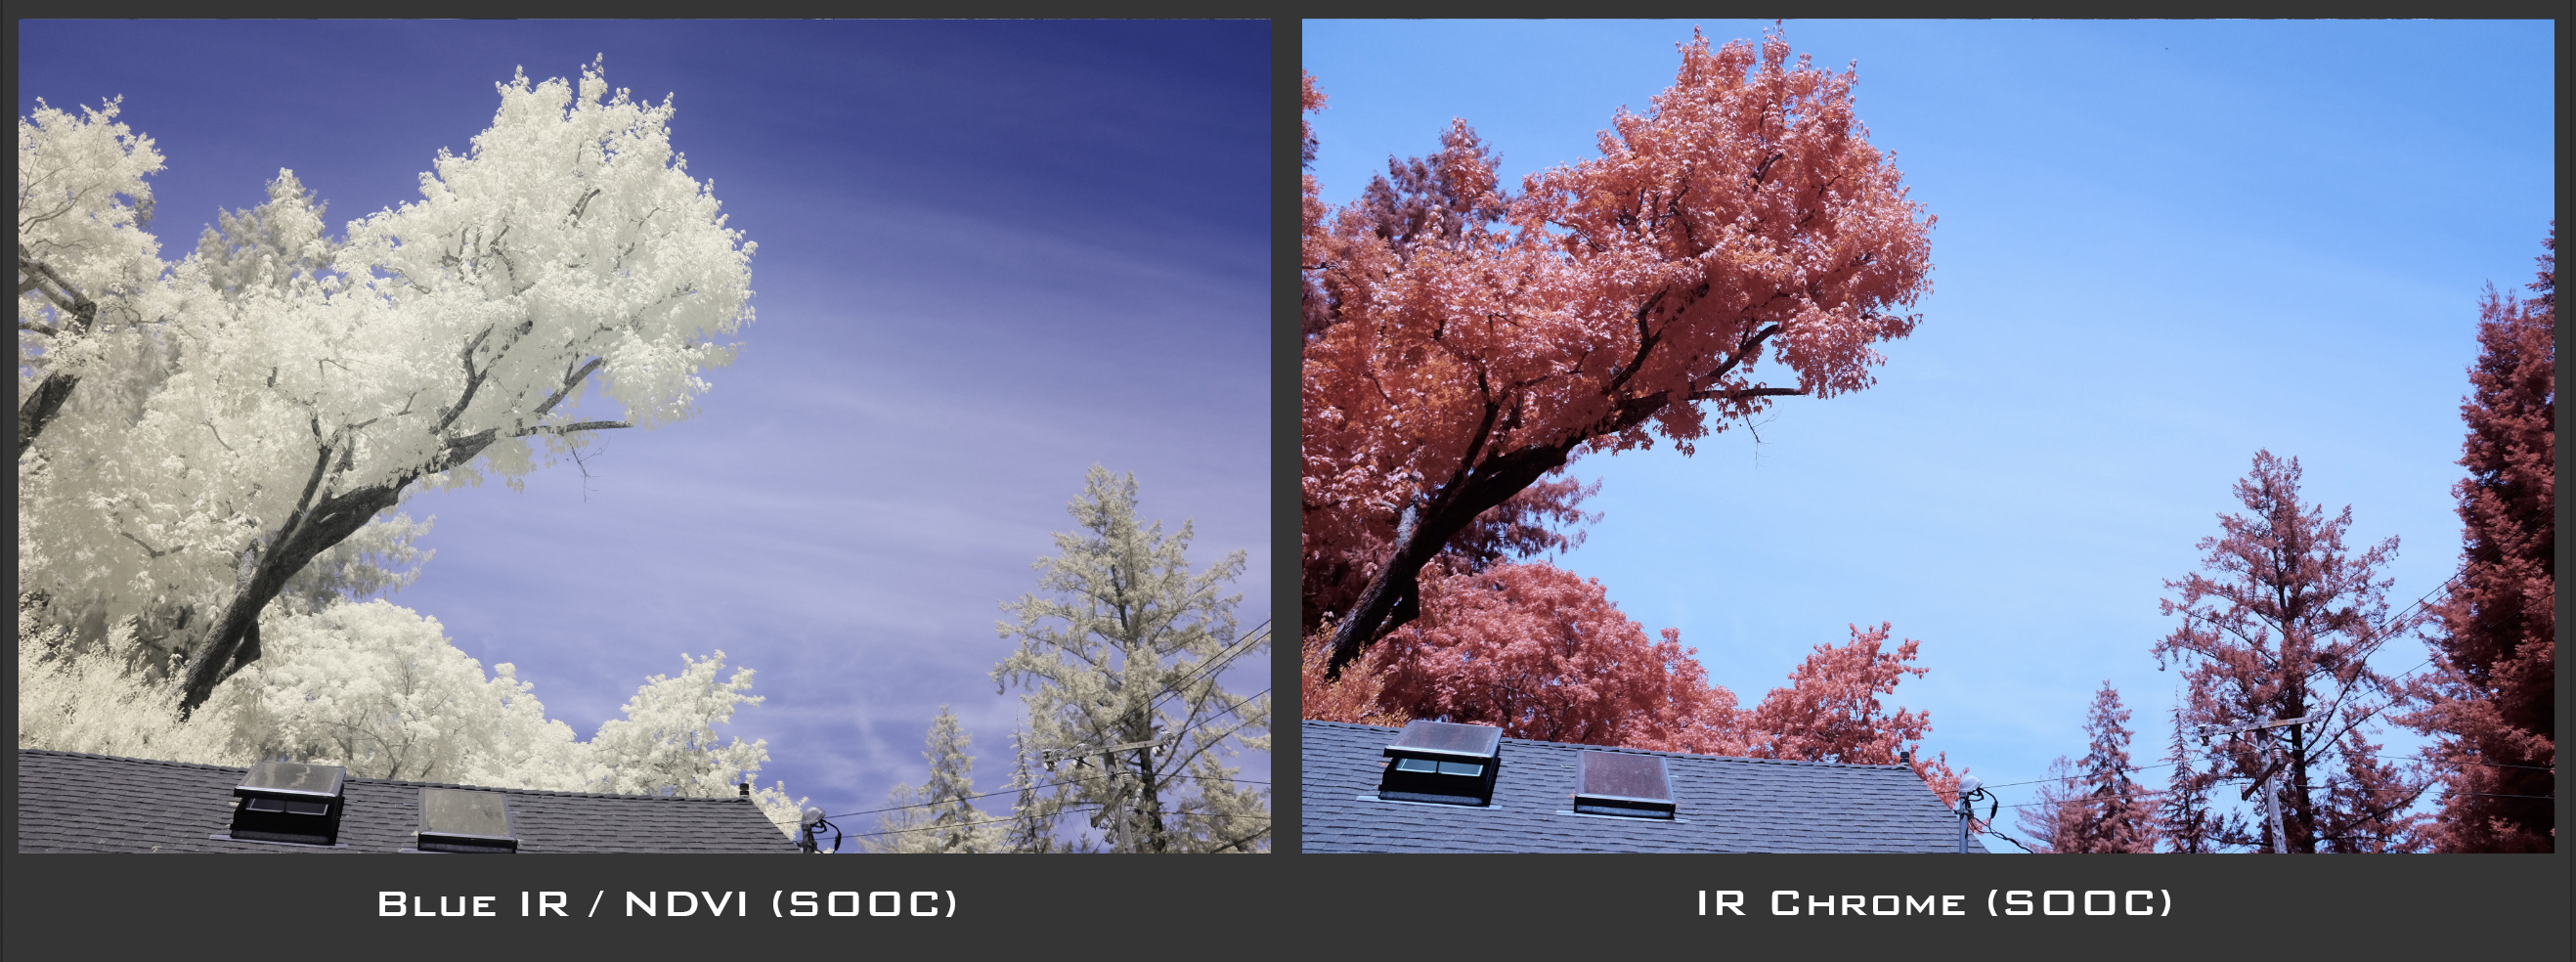
Straight-out-of-camera Blue IR / NDVI and IR Chrome
KolariVision IR Chrome: Digital Kodak Aerochrome
https://kolarivision.com/the-irchrome-infrared-photography-filter-our-digital-version-of-kodak-aerochrome
X100T Custom Settings for these discussed UV/IR filters:
- White Balance Offset: X100T supports only a single R/B color offset per WB type
- Kelvin: -9 Red & -8 Blue
- Auto: +6 Red & -3 Blue
- Incandescent: -9 Red & -6 Blue
- Fluorescent Light-2: 0 Red, 0 Blue
Kolari Blue IR / NDVI Filter:
- EV +1/3 to +1 1/3
- ISO: Auto up to 3200
- Dynamic Range: 400
- Film Simulation: Classic Chrome
- White Balance: K3600, -9 Red & -8 Blue
- Color: 0
- Sharpness: +2
- Highlight Tone: -1
- Shadow Tone: +1
- Noise Reduction: -2
Kolari IR Chrome Filter:
- EV +1/3 to +1
- ISO: Auto up to 3200
- Dynamic Range: 400
- Film Simulation: Classic Chrome
- White Balance: Auto, +6 Red & -3 Blue
- Color: +2
- Sharpness: +1
- Highlight Tone: +1
- Shadow Tone: +1
- Noise Reduction: 0
- — less strident alternate —
- White Balance: Auto, +6 Red & 0 Blue
- Color: -2
LifePixel 720nm Filter:
- EV +2/3 to +1 1/3
- ISO: Auto up to 3200
- Dynamic Range: 200
- Film Simulation: Pro Neg. Std
- White Balance: Incandescent (~3100K), -9 Red & -6 Blue
- Color: -2
- Sharpness: +1
- Highlight Tone: -2
- Shadow Tone: 0
- Noise Reduction: -2
LifePixel 720nm Filter: Alternate
— Color Enhanced for R / B Channel Swapping
— Custom White Balance from imaging a green hedge in bright sun
- EV +2/3 to +1 1/3
- ISO: Auto up to 3200
- Dynamic Range: Auto
- Film Simulation: Velvia
- White Balance: Custom (~2000K), -9 Red & -6 Blue
- Color: +1
- Sharpness: +2
- Highlight Tone: -1
- Shadow Tone: +1
- Noise Reduction: -2
Kolari 850nm Filter [ Deep IR ]
Kolari Blue IR / NDVI + Hot Mirror Filters [ Extended UV ]
- Deep IR: EV +/- 1/3
- Extended UV: EV +2/3 to +1 1/3
- ISO: Auto up to 3200
- Dynamic Range: 400
- Film Simulation: Monochrome
- White Balance: Fluorescent Light-2, 0 Red & 0 Blue
- Color: N/A
- Sharpness: +2
- Highlight Tone: +2
- Shadow Tone: +2
- Noise Reduction: -2
Straight Out Of Camera Image Samples:
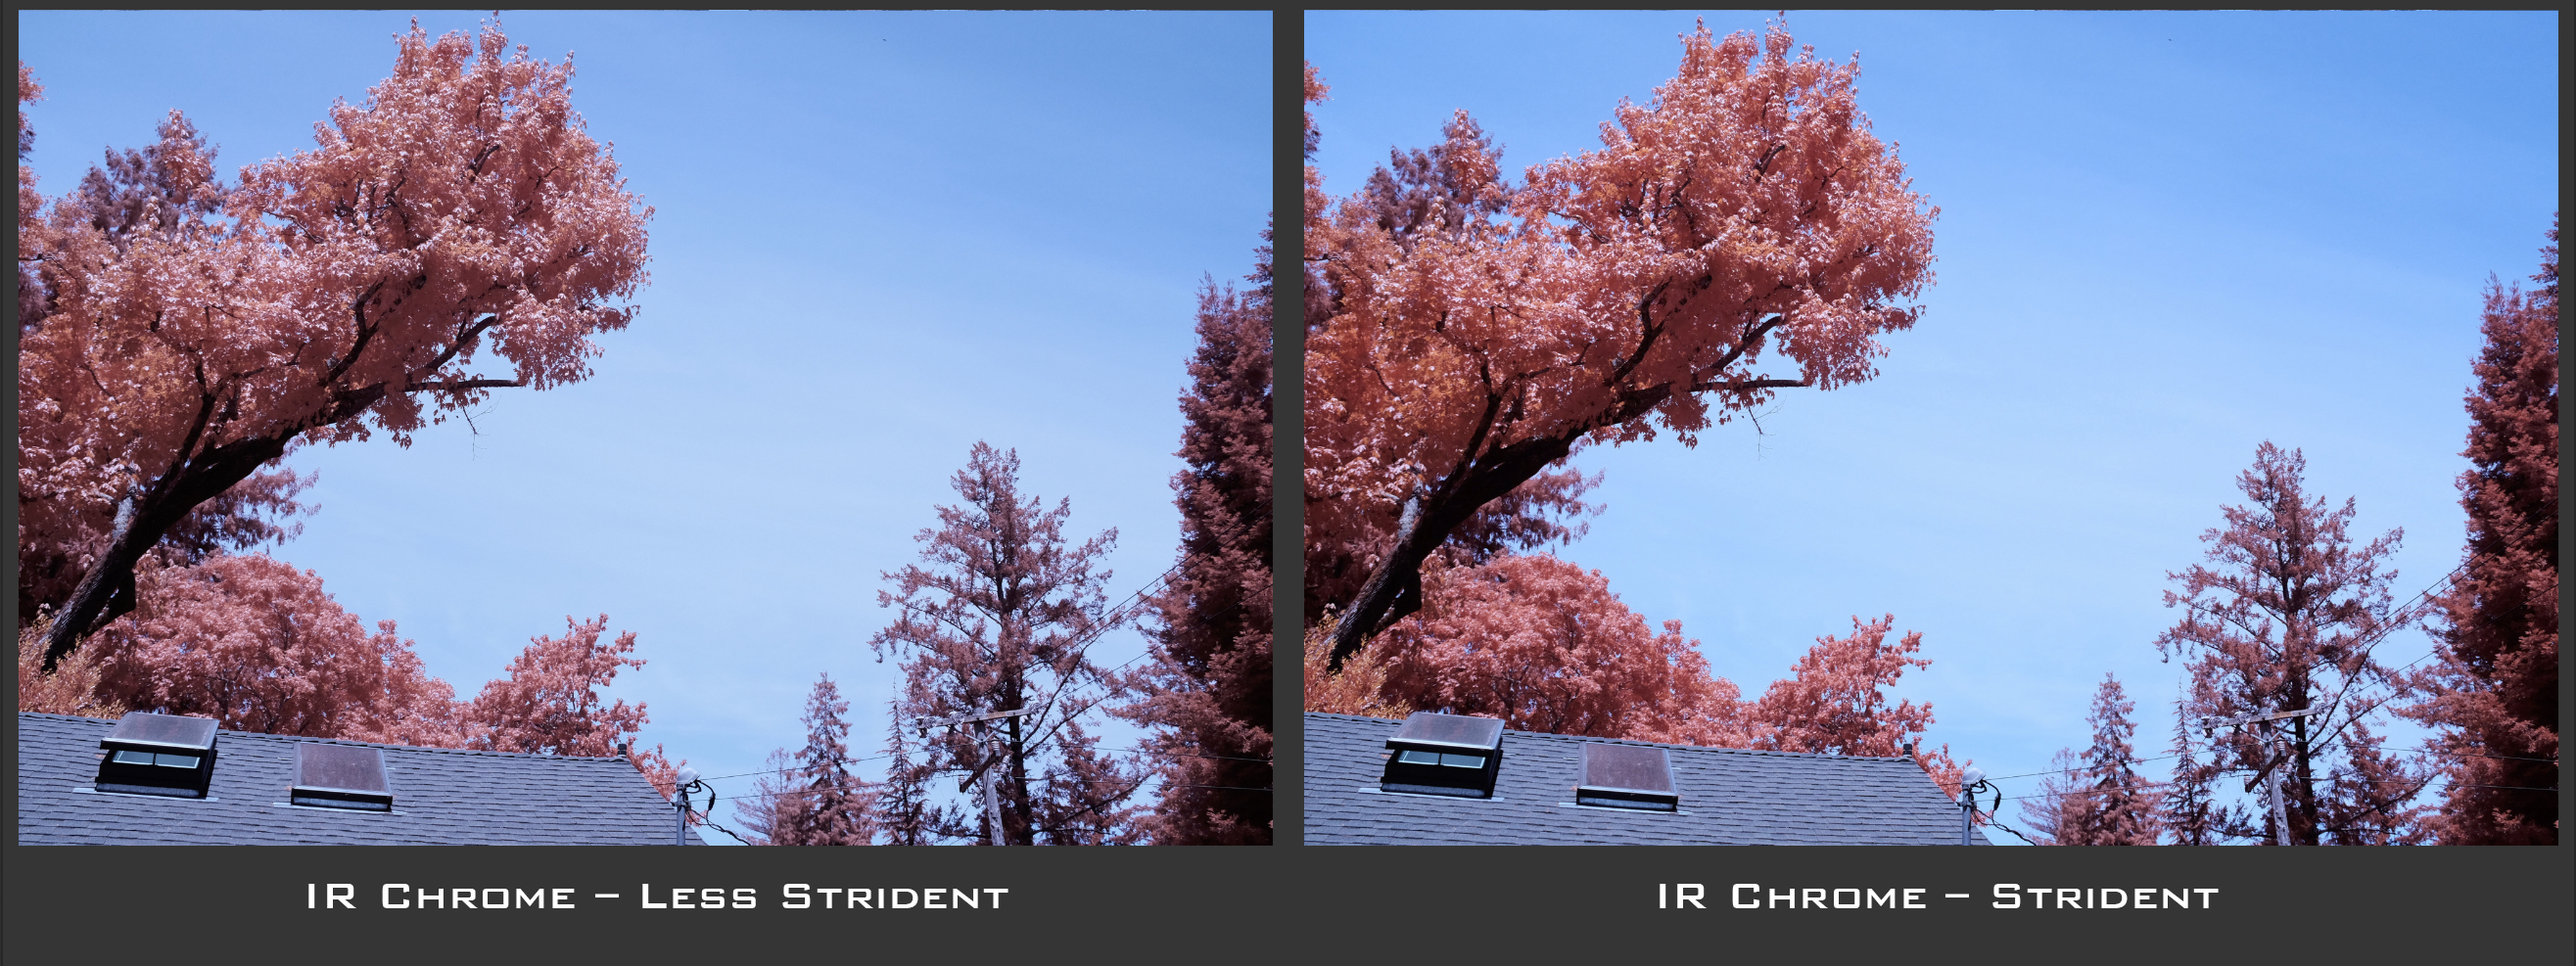
Kolari IR Chrome Filter – Difference showing alternate custom setting
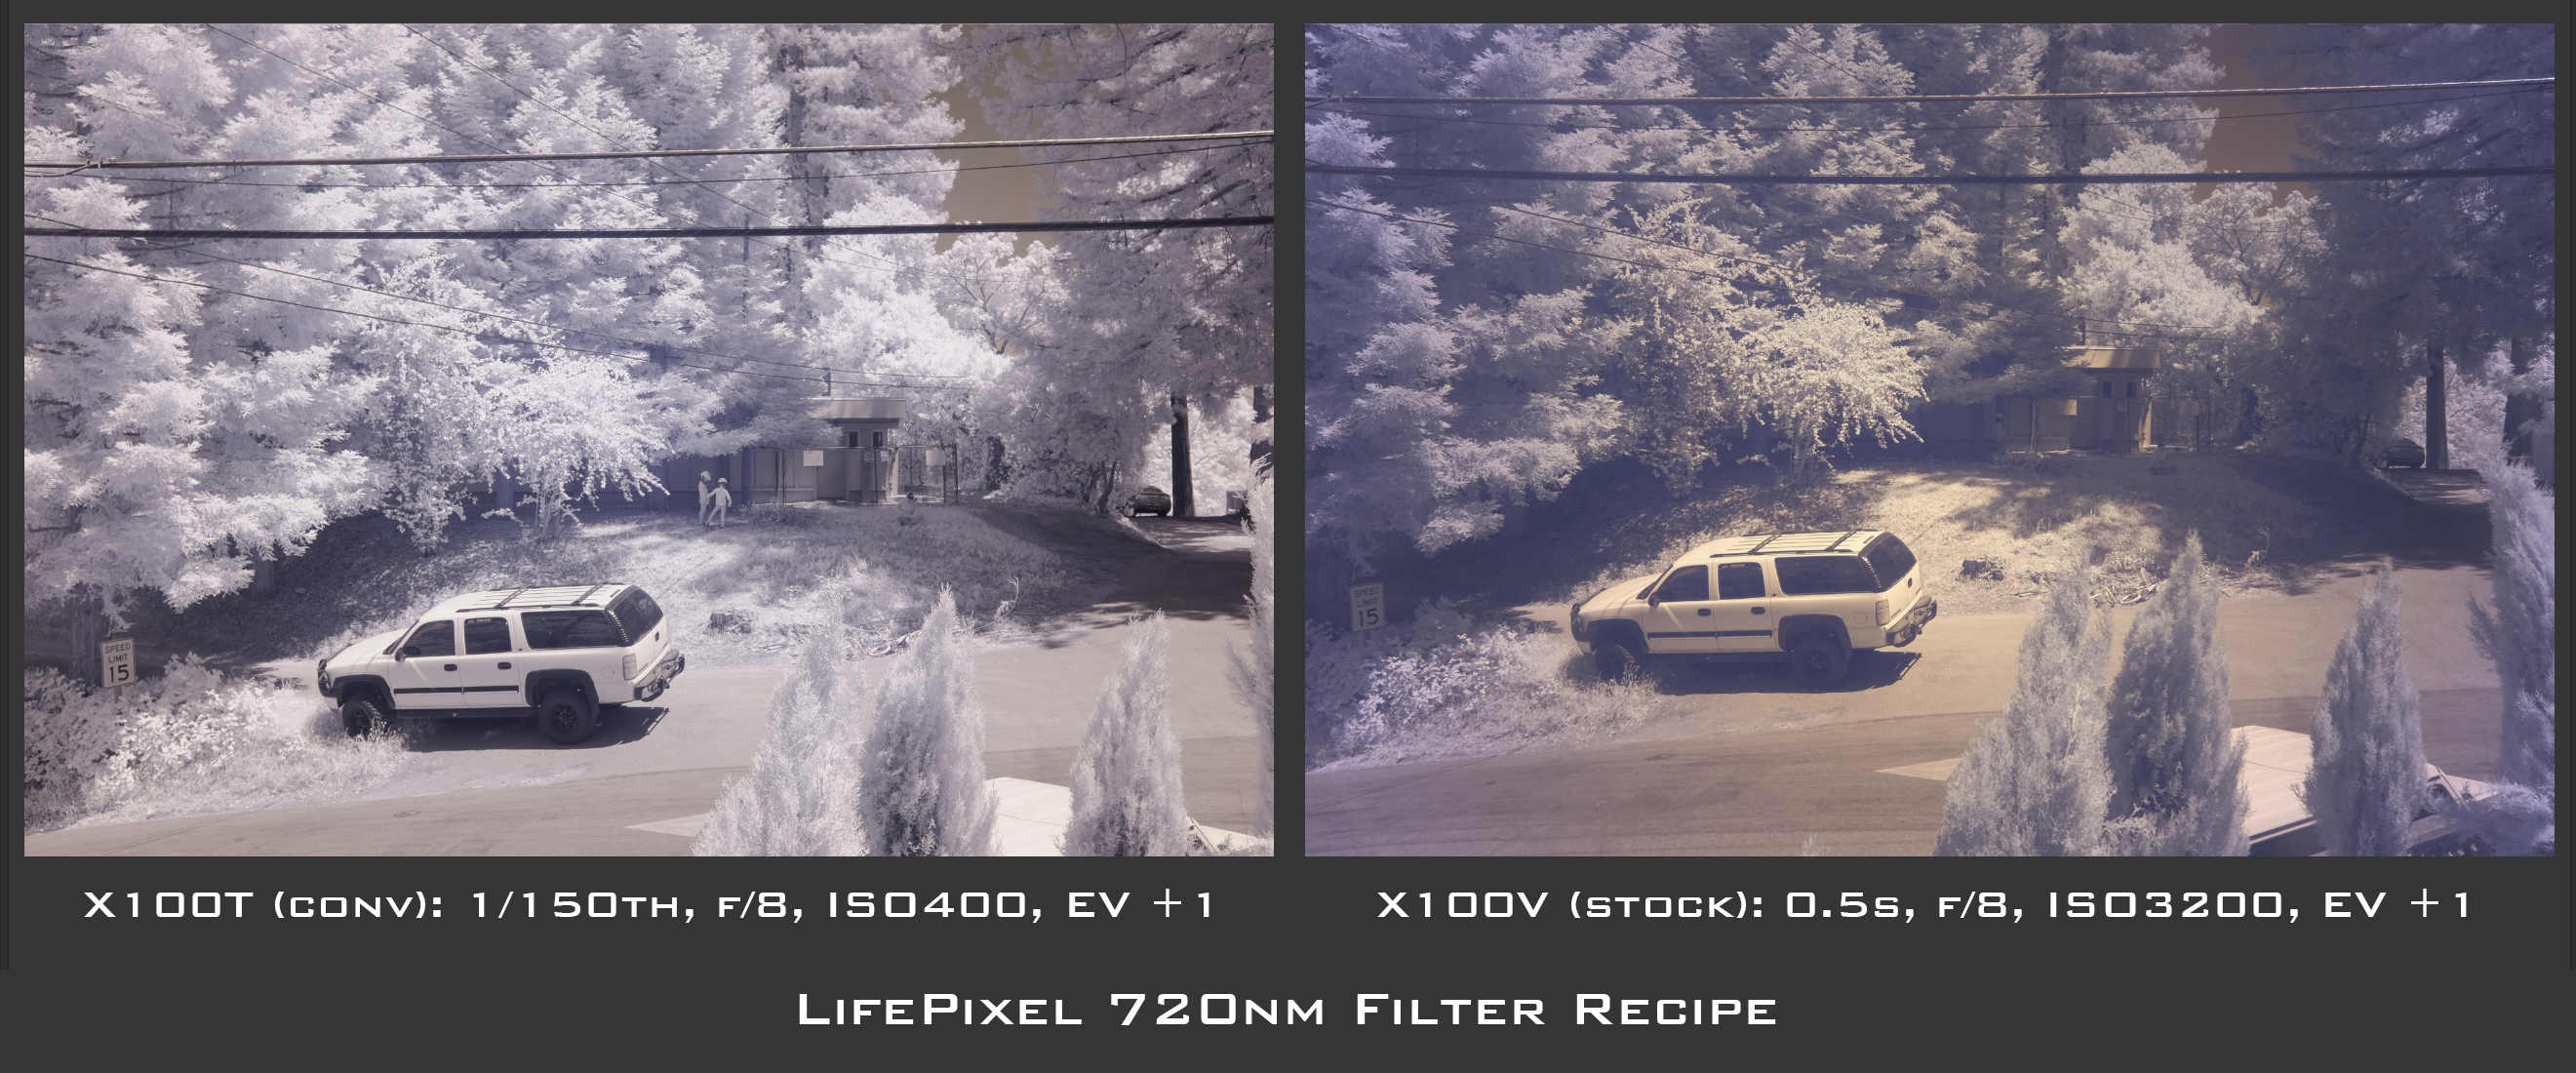
720nm Filter – X100T (converted) vs. X100V (stock) recipe comparison
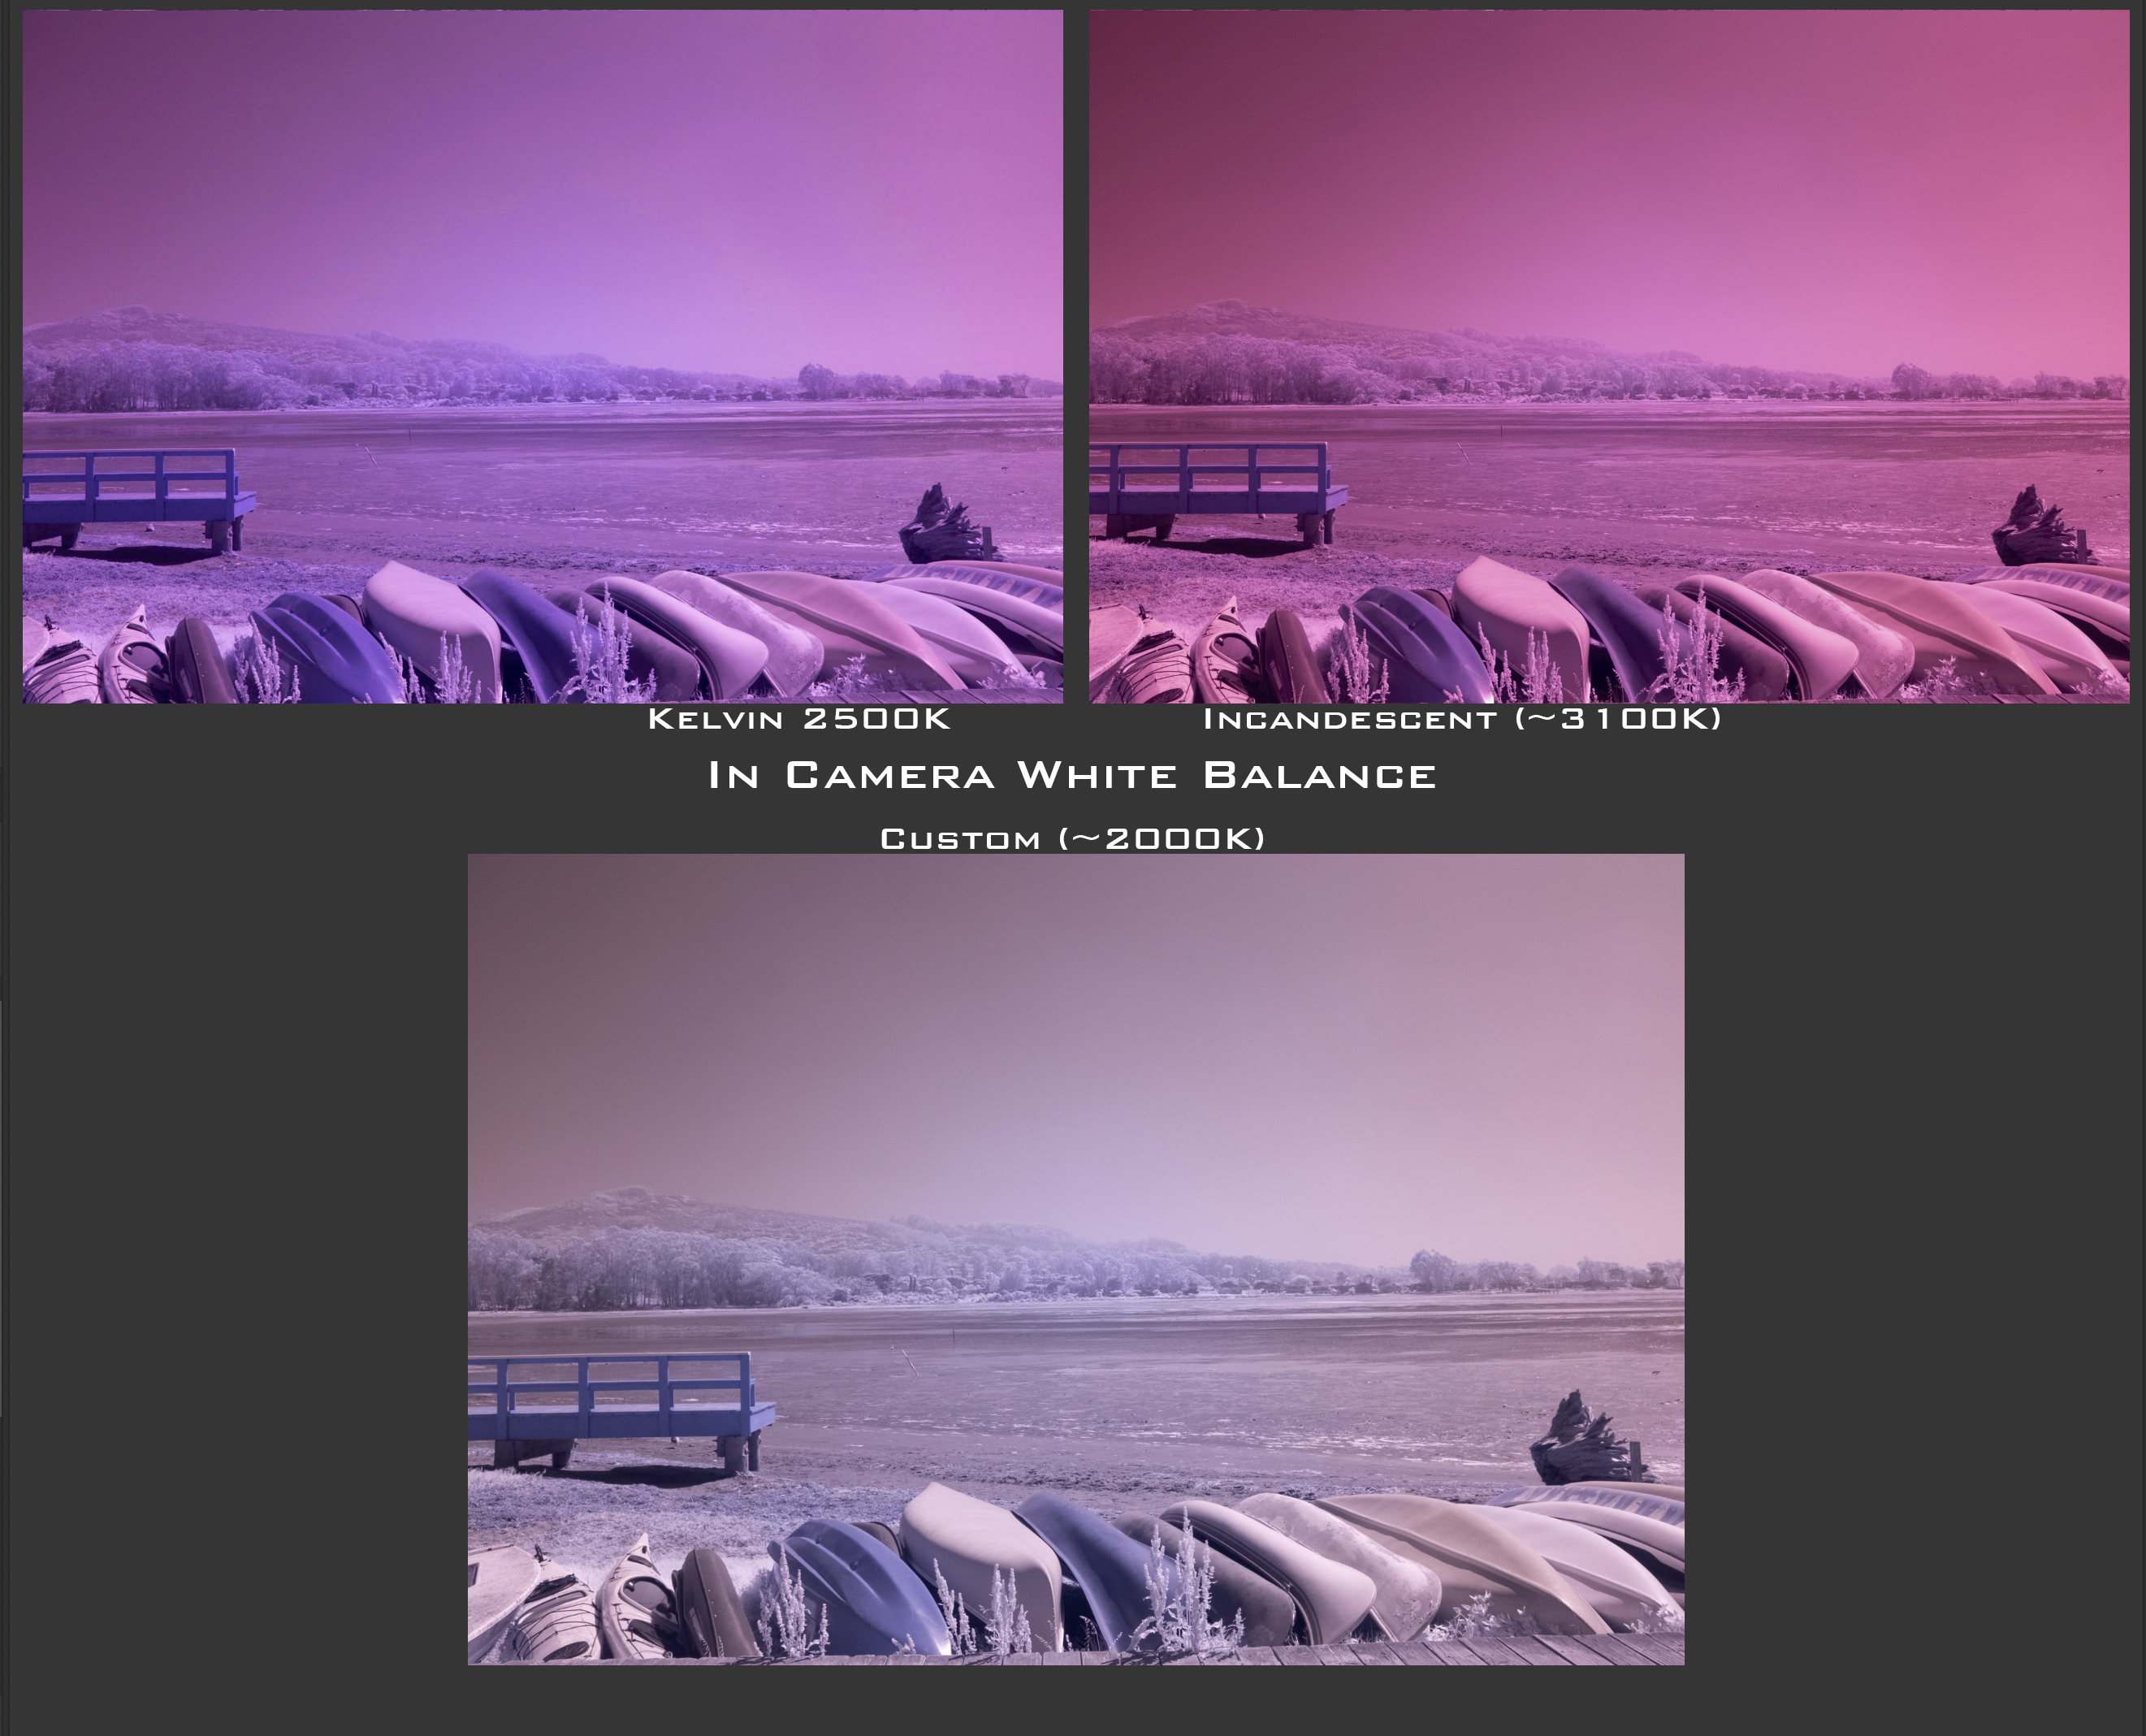
720nm Filter: Camera Custom WB can be set below camera minimum Kelvin 2500K temperature. Images cool as the temperature goes down.
Note: Unprocessed RAW White Balance with Red 0 & Blue 0 color offset
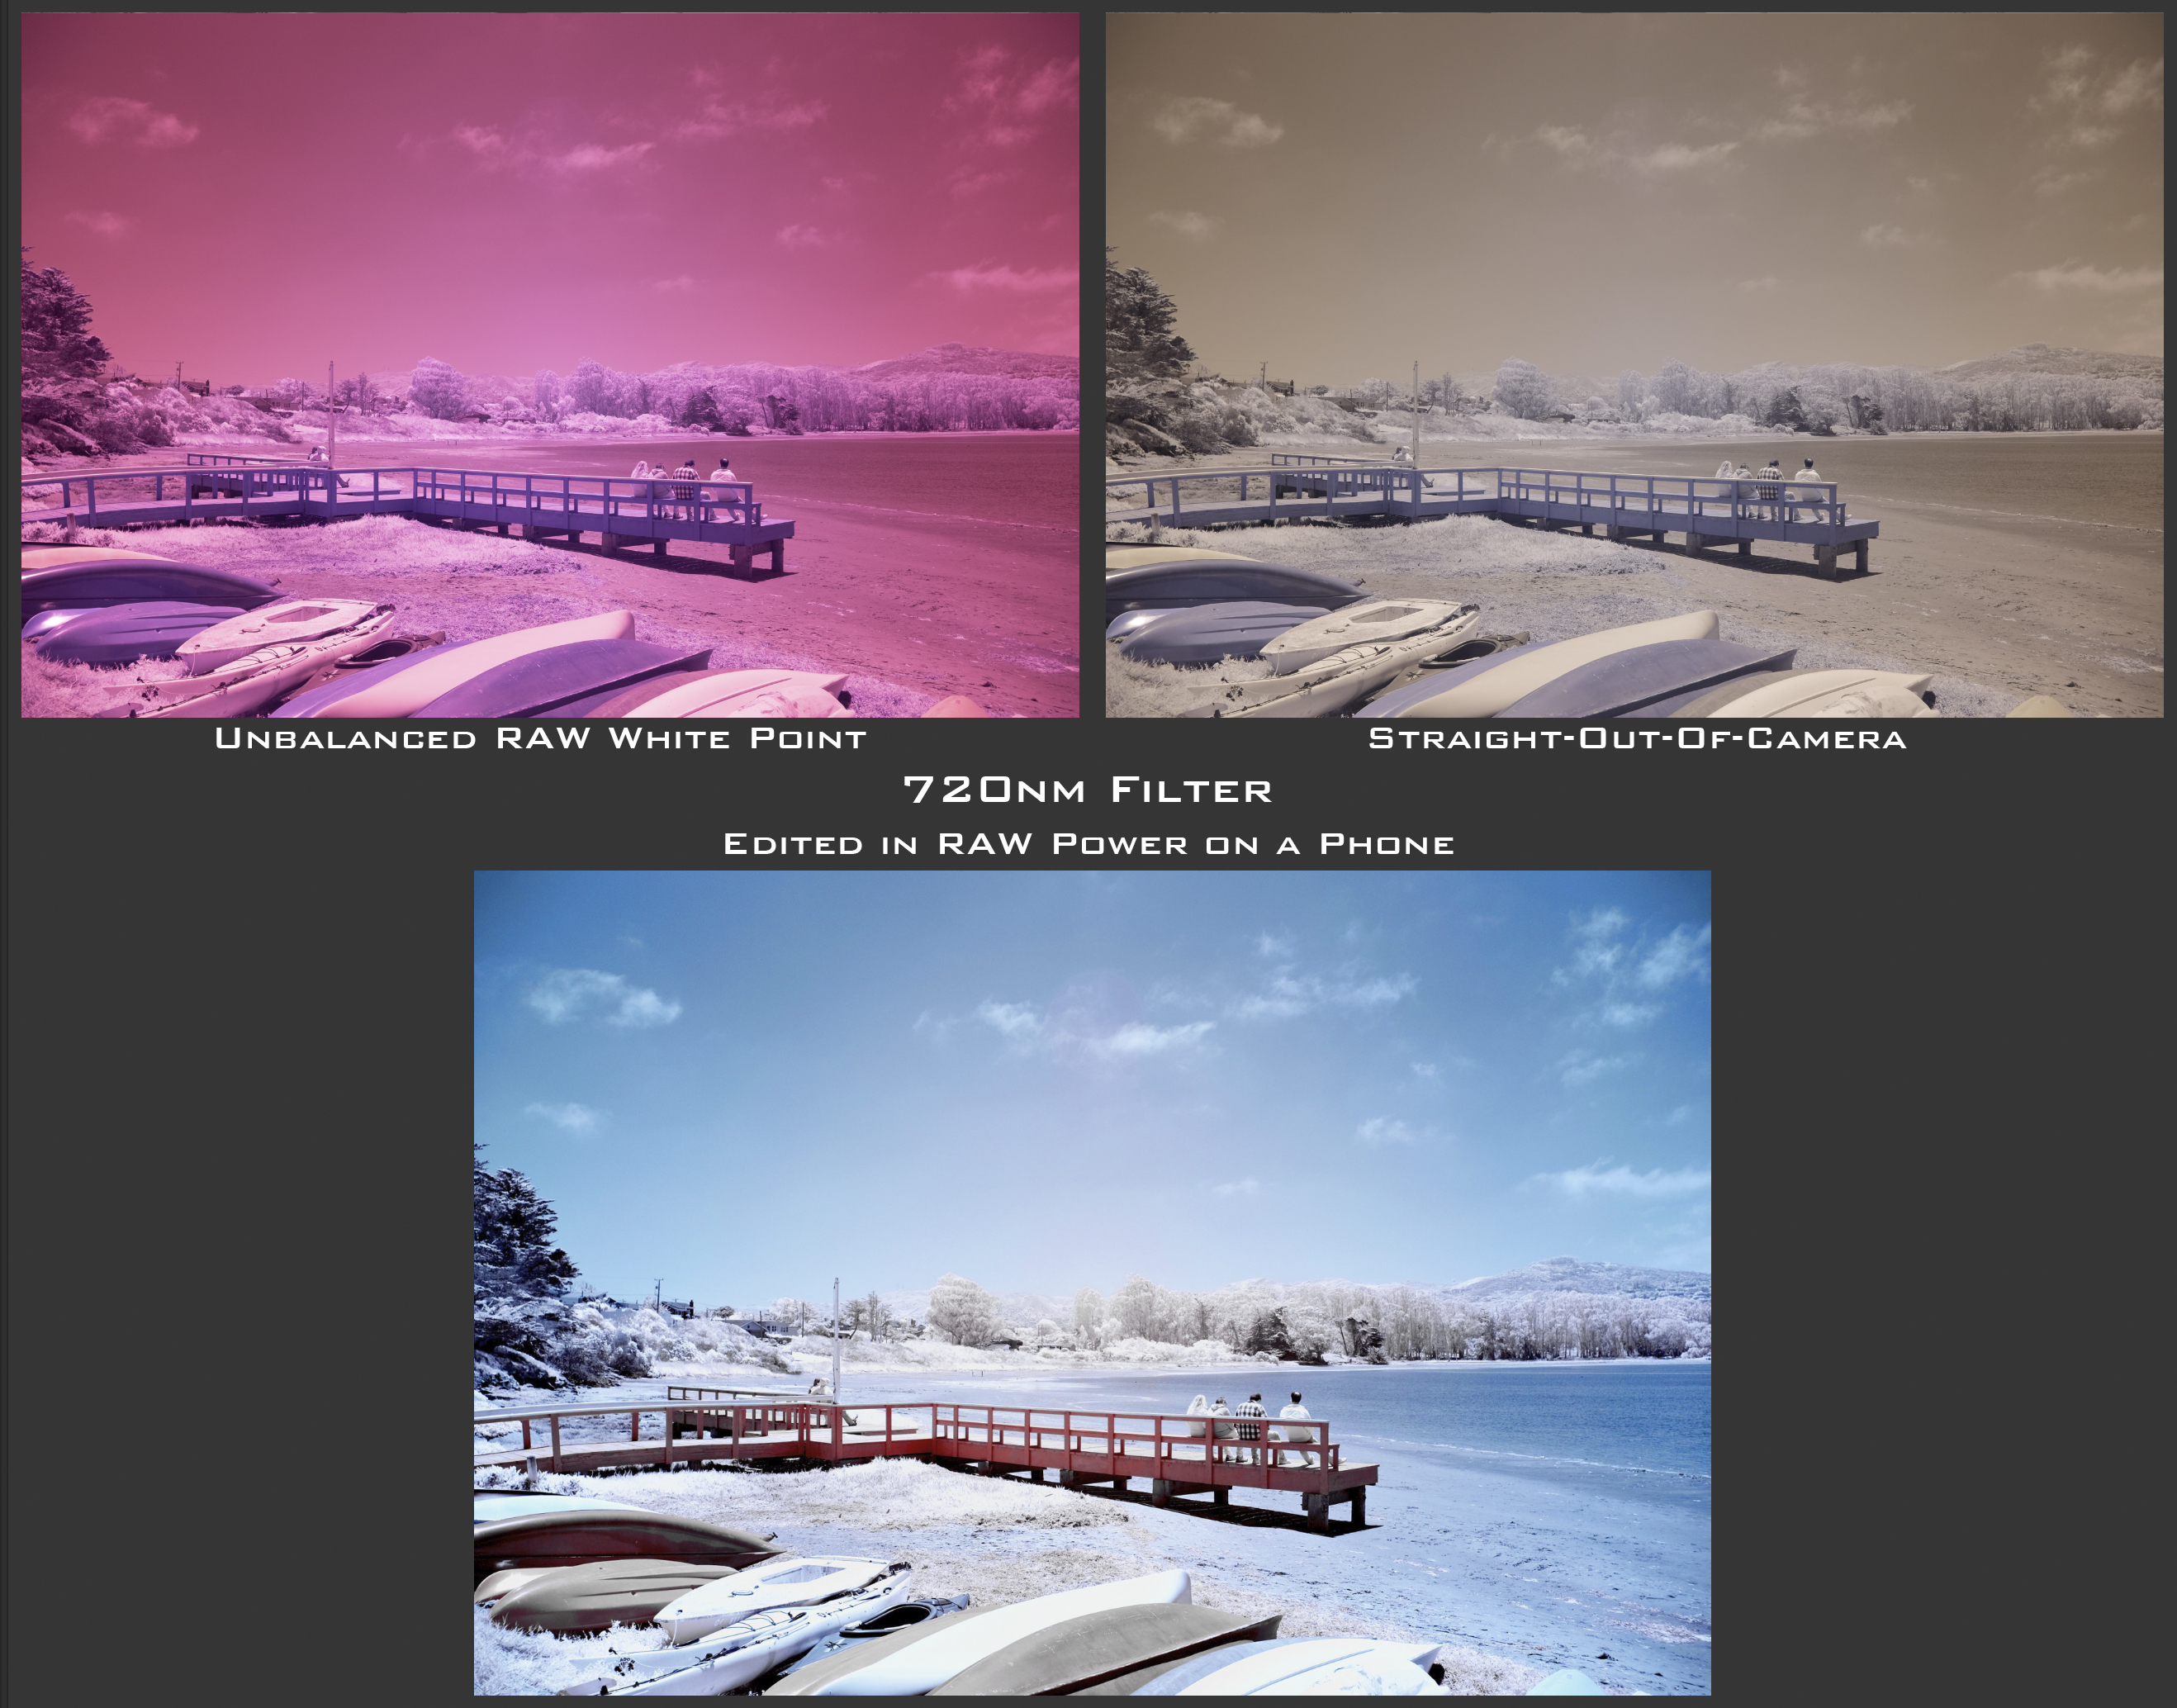
720nm Filter: The power of RAW Power on a phone and why the Blue Pier should not be red

Blue IR / NDVI Filter: The power of RAW Power on a phone and why the Blue Pier should remain blue
Filter & Recipe: Kolari Blue IR / NDVI
Exposure: 1/480th, f/8, ISO 800, EV +1/3
Filter & Recipe: Kolari IR Chrome
Exposure: 1/340th, f/8, ISO 800, EV +1/3
Filter & Recipe: LifePixel 720nm
Exposure: 1/240th, f/8, ISO 400, EV +1
Filter & Recipe: Kolari 850nm (Deep IR)
Exposure: 1/110th, f/8, ISO 800, EV +1/3
Filters & Recipe: Kolari Blue IR / NDVI + Kolari Hot Mirror (Extended UV)
Exposure: 1/56th, f/8, ISO 800, EV +1 1/3
Filters: Kolari Hot Mirror + Kolari H-Alpha
Recipe: Std Provia Simulation w/ Auto WB (+6 Red & -3 Blue)
Exposure: 1/480th, f/8, ISO 800, EV +1/3
Note: This filter combination mimics manufacturer’s UV/IR filtering
Filter Free, Blue IR / NDVI Recipe (recipes make a huge difference!)
Exposure: 1/900th, f/8, ISO 800, EV +2/3
Filter Free, 720nm Recipe (recipes make a huge difference!)
Exposure: 1/800th, f/8, ISO 800, EV +2/3

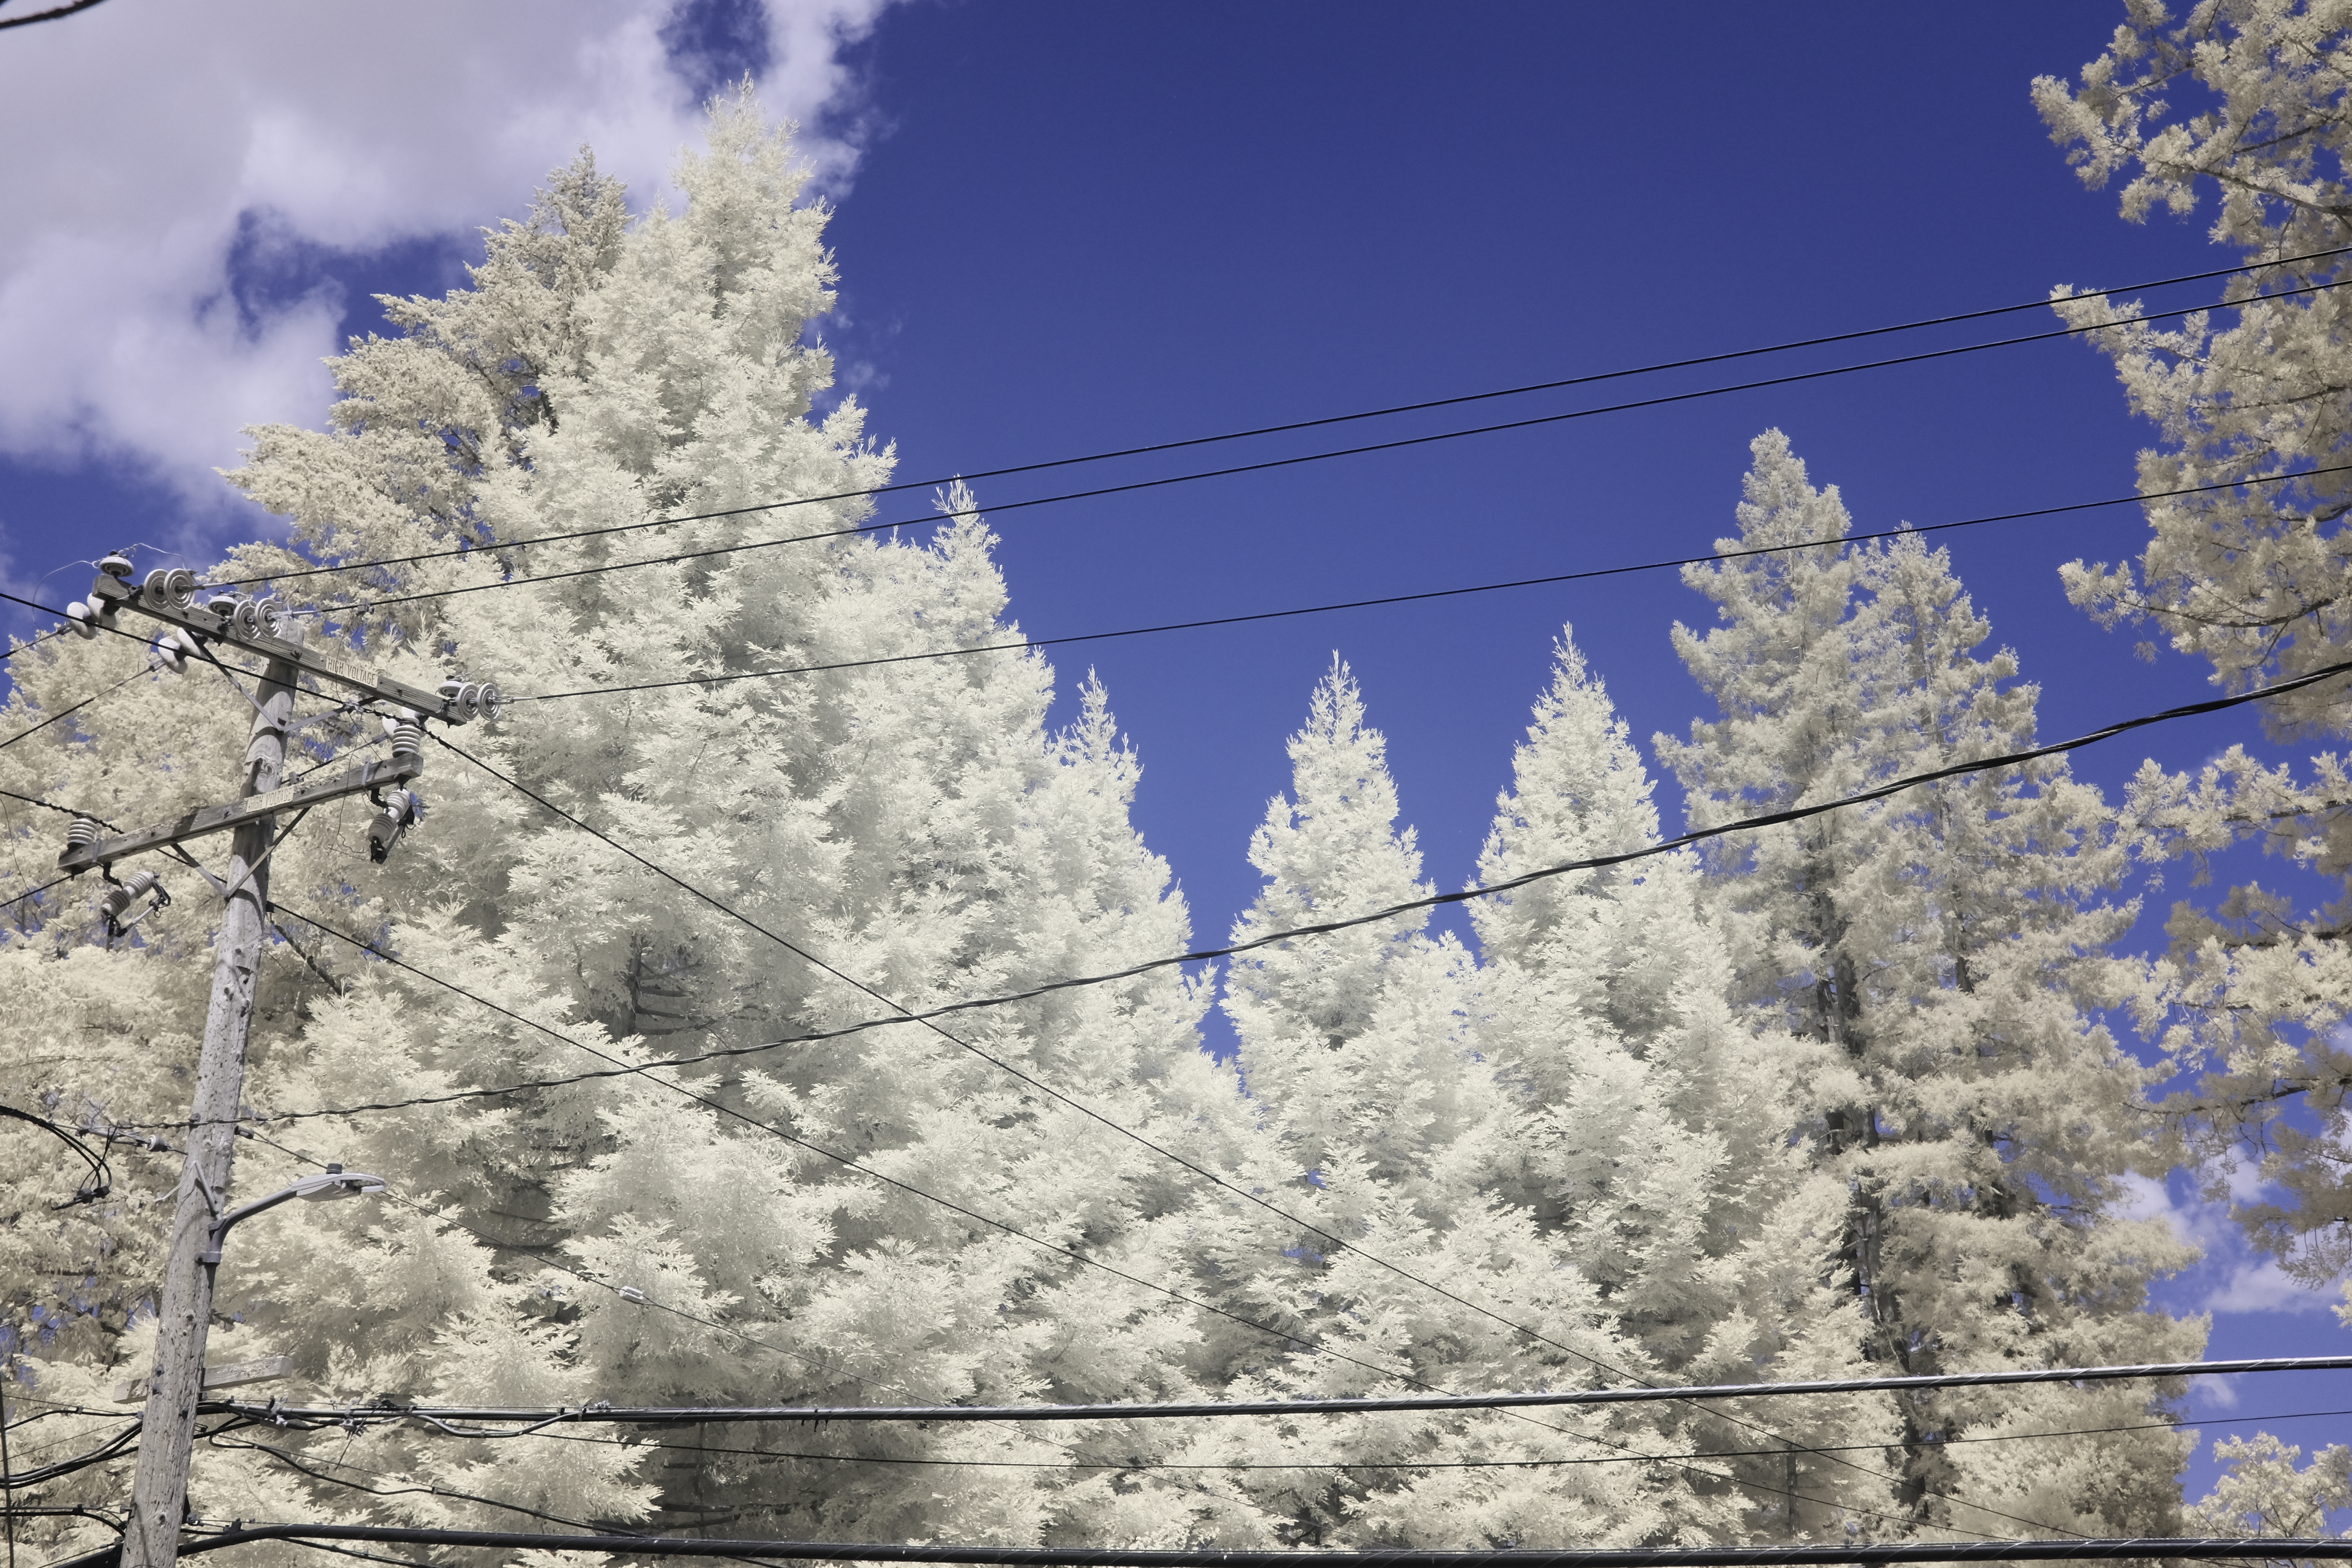
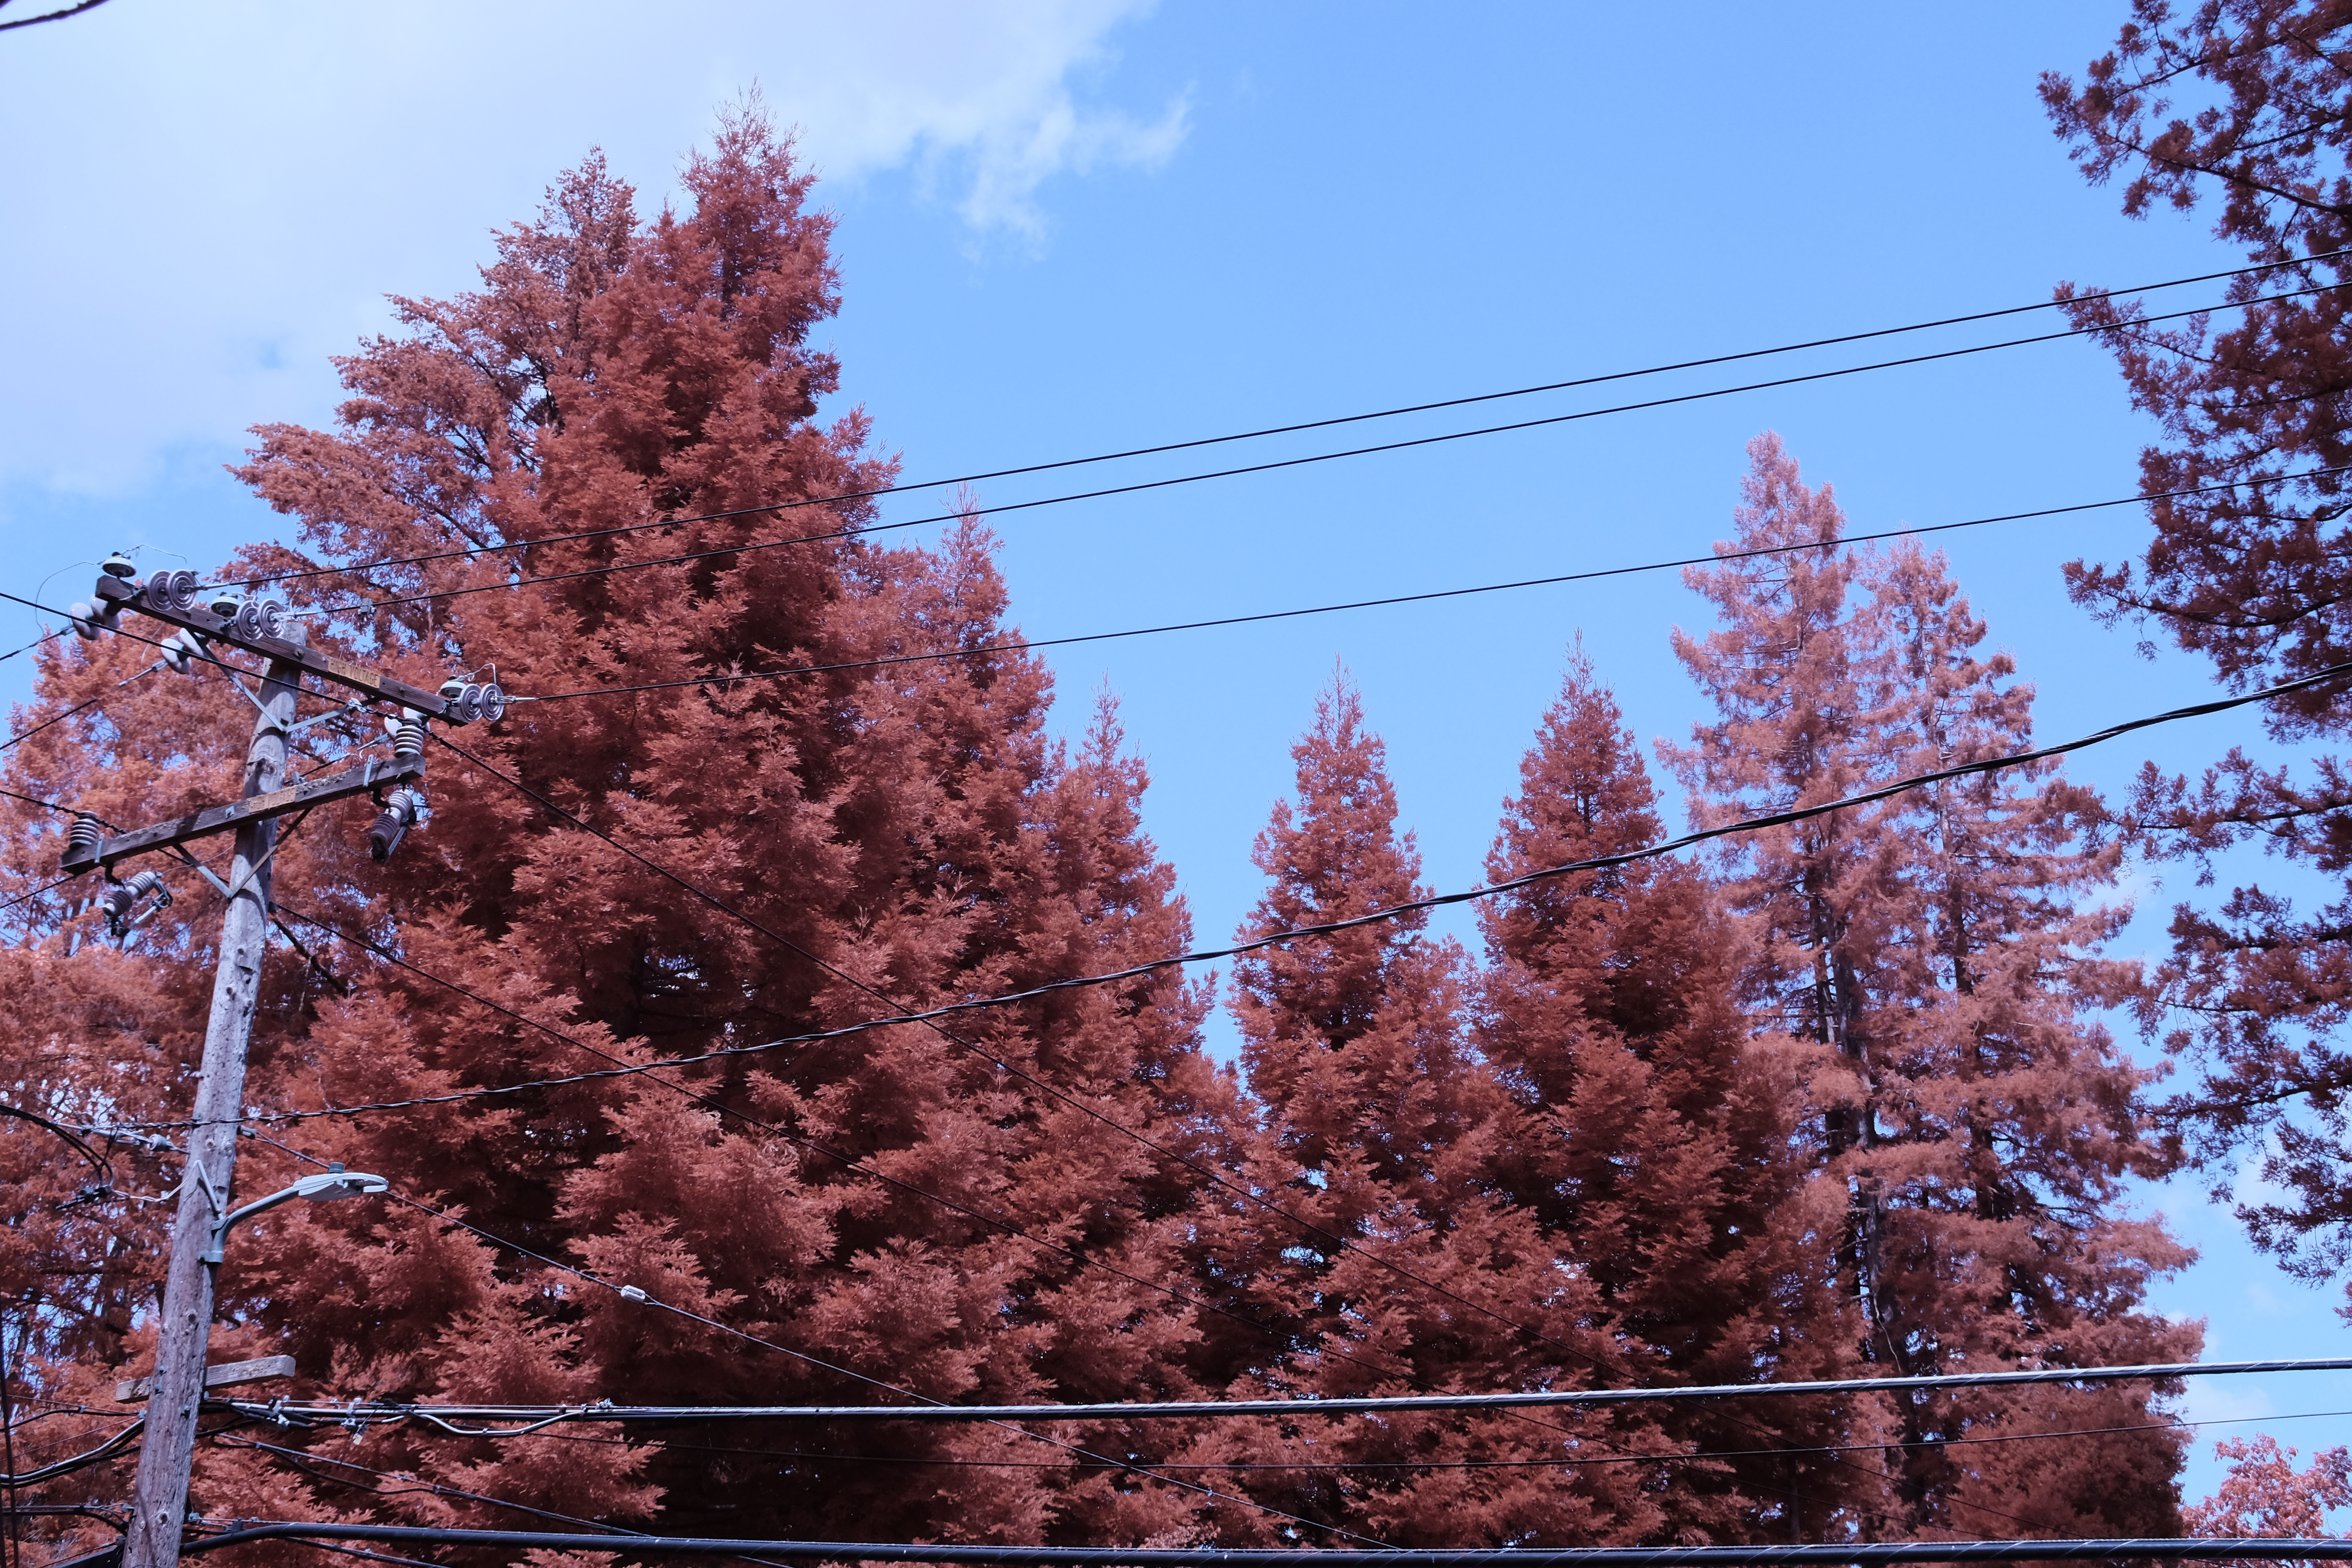
IR Crazy Colors
You’ve made it this far, how about …
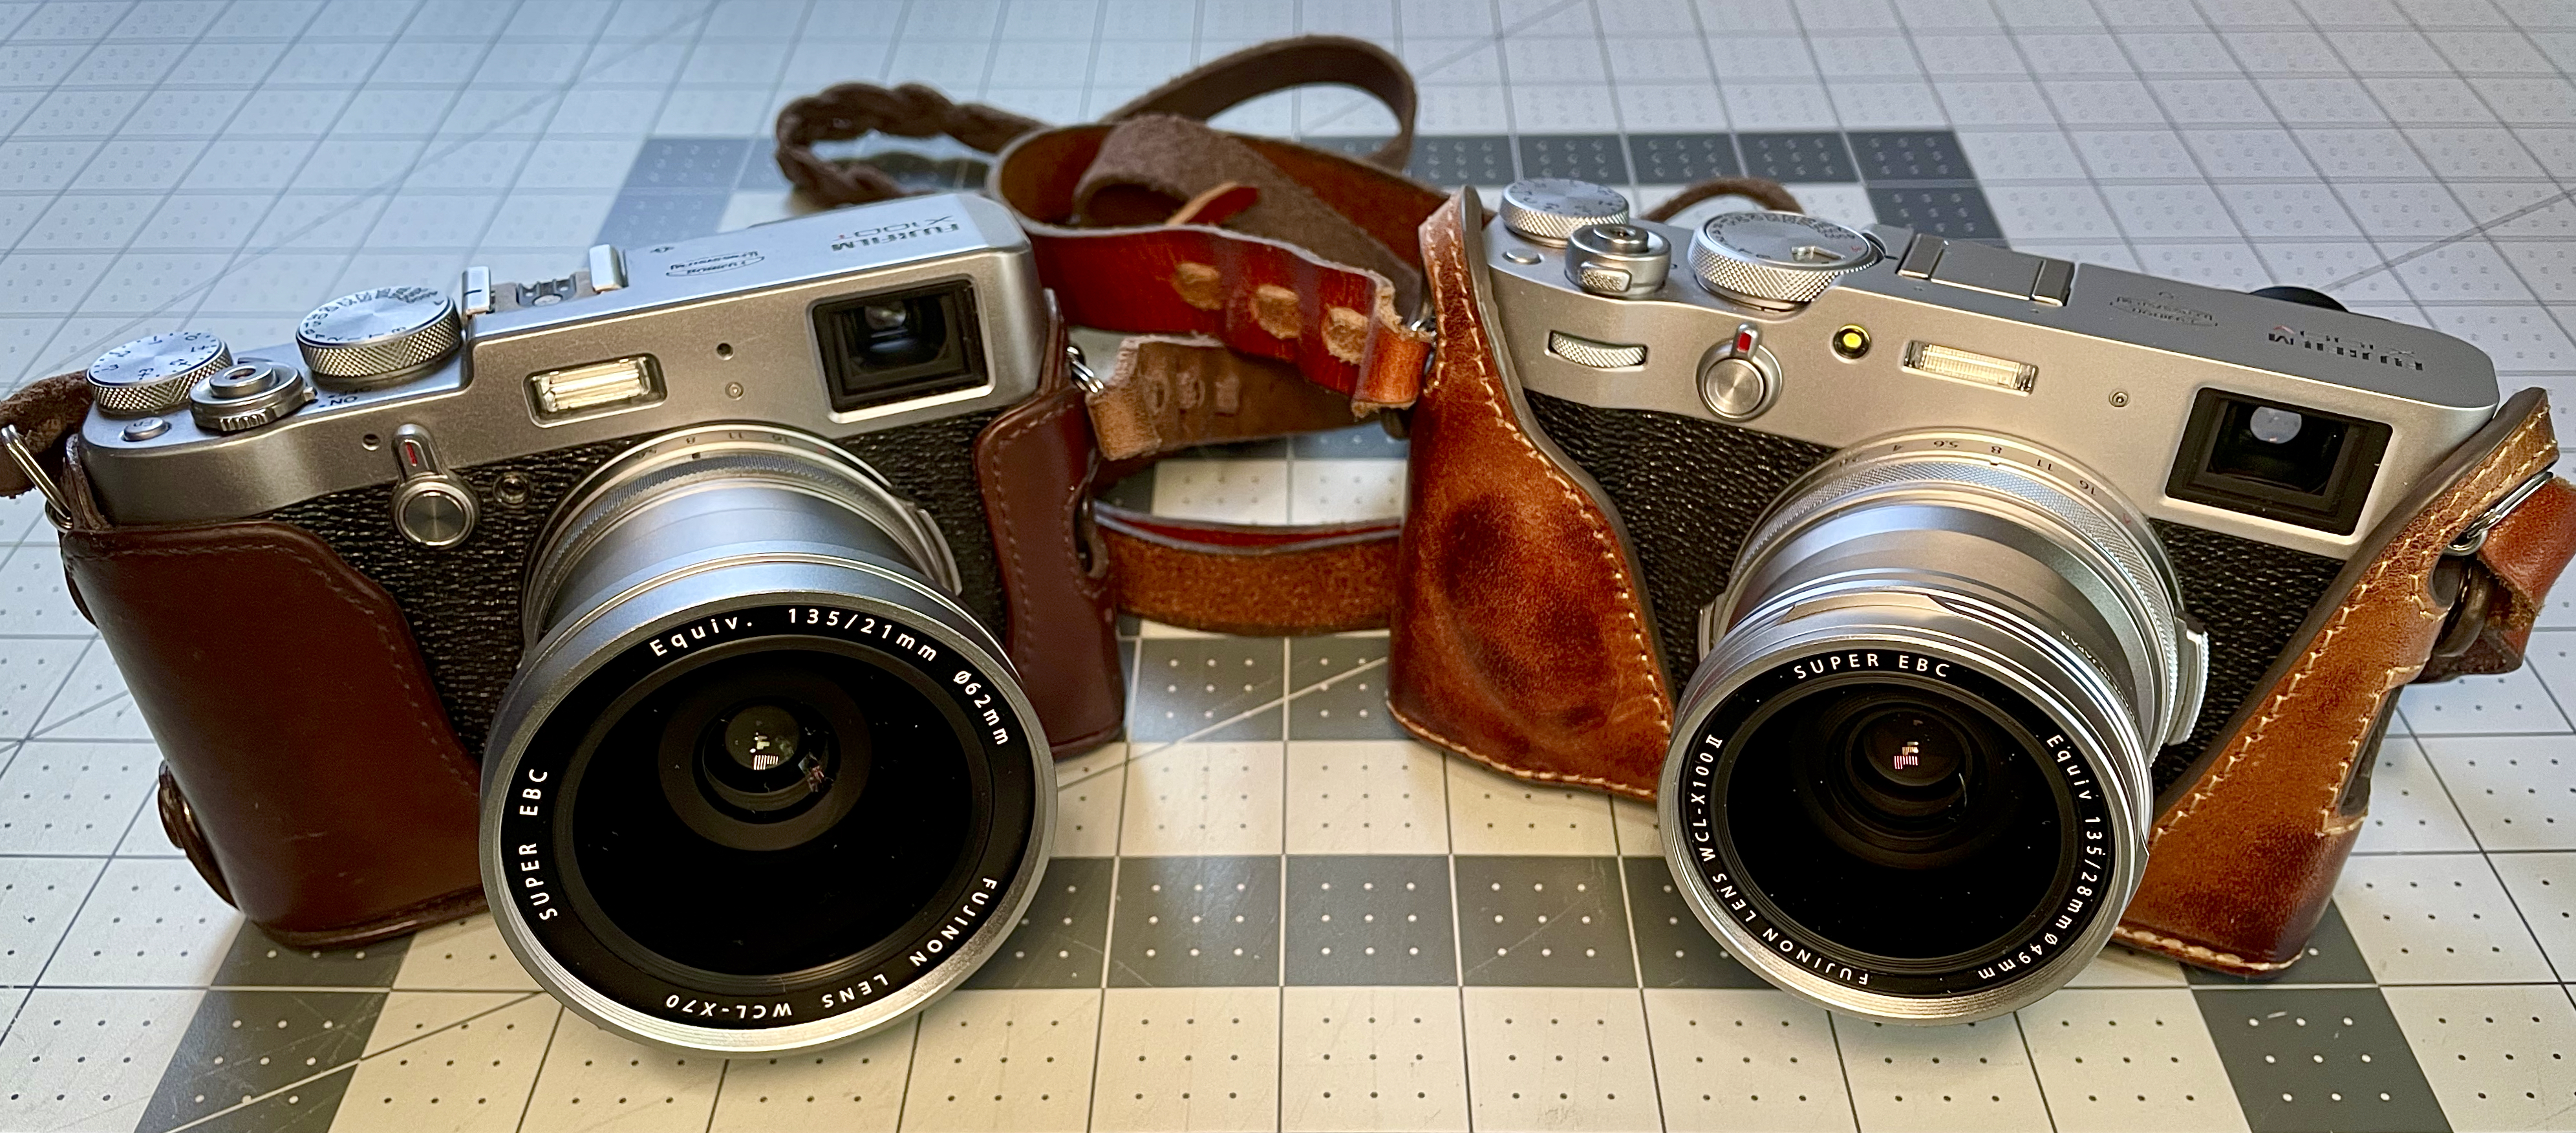
X100T w/ WCL-X70 lens with Fuji leather half-case and handmade strap
– & –
X100V w/ WCL-X100 lens with Kaza leather half-case and handmade strap
Lenses, lenses, lenses. Lots of lens information surrounding IR photography, as there should. However, this being about a FujiFilm X100T full spectrum conversion, lenses are really not an issue, mostly. The built-in 35mm is just what you get. Oh, and the 50mm TCL-X100 teleconverter, and the 28mm WCL-X100 wide angle converter, and that odd-man-out WCL-X70 wide angle converter for the X70 camera that might be compatible with X100 systems.
Built-in 23mm pancake: 35mm equiv FOV and 49mm filter threads. Not much of an IR hotspot, more of a brighter center image than periphery. It is what it is, can’t change it.
WCL-X100: 28mm equiv FOV and 49mm filter threads. Bonus it has same filter thread as built-in lens, so only one set of IR filters needed. Descent enough for X100T wide angle IR photography.
TCL-X100: 50mm equiv FOV and 67mm filter thread. Have not used one.
WCL-X70: 26-27mm equiv FOV and 62mm filter thread with same 49mm mating thread. Mechanically this lens is compatible with the X100T with its mating thread and rear lens housing ever so slightly deeper than that of the WCL-X100. Mechanical crashes of the movable built-in lens are unlikely from what I’ve measured, but I’ve only measured once! Optically compatible? Meh, a don’t care. We are creating photographs from wavelengths invisible to humans, so all ‘optically correct’ bets are off. Turns out this lens is not bad however. There is some edge fall off, some barrel distortion, but nothing show stopping. It uses a 62mm filter thread, so this is bothersome as two sets of filters are required, 49mm and 62mm, or a step-up ring to use 62mm filters on the built-in lens.
Pros and cons of the WCL-X100 vs WCL-X70 wide converter lenses for IR photography
- WCL-X70 has an ever so slightly wider FOV. Wider enough to mark this as a win rather than a who cares, but only barely.
- WCL-X70 uses a 62mm filter thread, meaning two sets of filters are needed or use a step-up ring.
- WCL-X70 has better control over lens flare
- WCL-X70 has less of an IR hotspot
- WCL-X70 used is less expensive than WCL-X100 used
Winner: WCL-X100
Wait, what? Yes, the WCL-X100 (WCL-X100 II actually) wins. The use of a single set of filters with no adapter ring, for me, if essential. I don’t like to carry extra stuff, so carrying multiple sets of filters, or one set of large filters and a step up ring are a barrier to entry. The added FOV is nice, but using the optically corrected WCL-X100 II lens on both the X-100T and X-100V is more important. If carrying one lens, it will be the WCL-X100 II. For IR use, I can deal with lens flare and the slight increase of IR hotspot.
Images:

WCL-X70 w / 850nm Filter lens flare & hotspot
Std Velvia simulation, Custom WB ~2100 Kelvin

WCL-X100 w / 850nm Filter lens flare and hotspot
Std Velvia simulation, Custom WB ~2100 Kelvin
Eric Anderson
Special Edition Art Project
Every science begins as philosophy and ends as art…
…Science is the captured territory; and behind it are those secure regions in which knowledge and art build our imperfect and marvelous world. Philosophy seems to stand still, perplexed; but only because she leaves the fruits of victory to her daughters the sciences, and herself passes on, divinely discontent, to the uncertain and unexplored.
– Will Durant, The Story of Philosophy (1926)